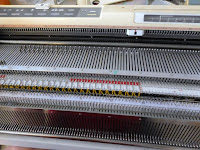
Having printed out a page of the Side Steps pattern – I thought it might be prudent to note any changes I made because you never know – I could forget what I did by the time I may get around to trying again? Who knows? But did I read it? no! of course not! I always think I know what I’m doing! The machine was set up for double bed work and as I put my hand on the carriage, I felt so good because it dawned on me, I was actually going to be knitting single bed, except for the 5 stitches at the hem side that would be the longstitch facing there. Those could be added next, but I wanted a plain row of stockinette for the initial row. Almost as though you were watching, I quickly changed to the knit arm as if I intended to do that all along and cast-on – I need two sections here, one for the sleeve stitches and the rest for the side seam. Duh! how about some weight, particularly as I would be using the double bed. I quit and wrote yesterday’s story – see what I mean? any excuse!
 Fresh
this morning, here I am at the machine even before my workout (I can do that
anytime). Just to refresh your memory (and mine but I can use you as the
excuse!) the one-row-tuck is set up so every other row is plain and that’s when
we want the longstitch to do the work on the rib bed so there are clean
stitches opposite, no tucks on the main bed, that would interfere with making
neat stitches on every other row on the rib bed, right? Right!
Fresh
this morning, here I am at the machine even before my workout (I can do that
anytime). Just to refresh your memory (and mine but I can use you as the
excuse!) the one-row-tuck is set up so every other row is plain and that’s when
we want the longstitch to do the work on the rib bed so there are clean
stitches opposite, no tucks on the main bed, that would interfere with making
neat stitches on every other row on the rib bed, right? Right!Cast on each section separately, using the single bed ribber comb method, https://knitwords.blogspot.com/2008/11/i-just-have-to-tell-you-i-finally.html
here’s how I did it: Bring out the needles you want, every other needle only. If using the knit carriage, obviously you don’t have the ribber up. If the ribber arm is on, you need to have the ribber engaged. With waste yarn, T10 (as loose as you can get), knit one row. Move the carriage out of the way (drop the rib bed to make it easier), take the ribber comb, with the wire out and insert it from below, same way as always, poking the fingers between the sinker loops. When it is successfully in there, with the sinker loops on your side of the prongs, tip the bottom of the comb back so the prongs come forward, allowing you to insert the wire, without catching the needles or sinker posts. Drop the comb. It falls below everything. Bring all needles to work, set stitch size to main tension, and knit 10-12 rows.
 What I did this time: using the
half width comb for the side seam portion (#75-0-10 ns) first, and then the small
comb for the sleeve section (#11-60 ns) but leave everything between/behind the
beds (add a row of ravel cord on each section to make it easier when rehanging
later). With the carriage at the left, T8, stockinette, knit 1 row. Change to
rib arm (read/program your row here) and add 5 sts at left on ribber for the
facing, end needle on ribber (less than my usual seven because that’s what E
Fisher did). Fingers crossed – that’s what swatches are for! Set to tuck (you
added weights, didn’t you?) and knit row. The rib needles have a loop on them, which is enough to cast them on - don't worry, no one is going to see them anyway and we don't want a difficult, complicated join between the Back and Front! This row was the tuck row. Back at the right side, now, set the ribber to knit those facing stitches only on every other row which in this case is 0-1, same as in Rectangles.
Everything
is knitting beautifully, shaping/increasing at right edge for the shoulder
slope and life is good! UH-oh, the shortrowed dart/gore is coming up – probably
a good time to take a break and get that workout in! ;)
No comments:
Post a Comment