Showing posts with label fixing mistakes. Show all posts

Thursday, April 30, 2020

cutting your losses...

Things go wrong here. I hope I don’t give you the impression that everything is always perfect. It's nice to think you have mad skills but stuff happens, it doesn't just go right every single time. Sometimes you can fudge things with no one the wiser, but you need to know the difference, when you can get away with it, when to re-do and the best way to do it.
Ripping out lace is never a good thing, maybe a row or two but more than that, you’re actually spending double the time to rip out lace because it’s harder to un-transfer, especially those two-step ones where the stitch ends up in behind. Now, even though I think I’m watching what I’m doing, I didn’t see this until after it was off the machine and pressed out. First, I noticed that one side of the neckline looks wonky. What the?? I did see, early on, while it was still on the machine, there is a mistake in the patterning  near the start of the vee motif but I had done the same on each side so one could argue, was it really a mistake? Not glaring and most people would never see it, but I know it’s there. I was justifying it to myself as I continued…
After pressing out the piece and holding it up in the mirror, I thought, ‘oh, gosh, darn, rats!’ I calmly walked away, spent the evening catching up on my DVRs. Today, still not quite ready to admit defeat, I held it up and thought about ripping it back to the beginning of the neckline shaping. Note, there are no solid, plain rows in this pattern which would help with rehanging.
Add to the equation, I am a bit nervous about running out of ‘French navy’ for this project. Started with 200g (final weight of my ivory one, 230g, 42 finished bust) and thought that would be plenty. This is for Shannon, another very slim girl so am making finished 34, but she’s fairly tall, about 5’7, I think, so I added 20 rows to the length. My backup plan was using 50g of ‘twilight’ for the armhole and neck bands, which seemed feasible before I knit anything but now, looking at it, not so much. I could just abandon the whole thing and bake muffins, but I have a commitment, to myself anyway!
To be honest, I knit the second piece up the underarm, still trying to convince myself that the other side would/could be acceptable. At this point, I decided to reknit the lace on this piece and, then, off the machine, rip the other one back to the underarm, rehang it in the plain stockinette. It only took an hour and a half to get this one finished, no mistakes! Golden!

Friday, May 11, 2018

error correction 101...

oh man! how did this happen? I’ve been power knitting, I’ll admit – when I get excited about a project, it’s hard to slow down - I can’t wait to see the final thing! Two sleeves, one back and two fronts knit – did I forget to mention this was random, nothing matching? Pinned them together, tried on and was happy with the result.
Took the pins out and began the seaming. I always seam the bands/hems by hand and then hang the long seams on the machine or the linker. Did that for the sleeves, excellent result. Did the right front to the back. Good to go and then brought the left front hem to the back, butting them together and OMG! The front hem is slightly narrower than the back! I must have fudged the row counter – for this double bed hem, after knitting the waste yarn and circular ravel cord, I place the carriages at the left and knit the first row of main yarn, zigzag from left to right. Then, set to circular, and turn the row counter to 000…whatever, the front hem is only 18 rows as opposed to the other 20 rows! Arr-g-g-h! Two options come to mind…re-knit the entire right front? Go for the save by re-making the hem and grafting it onto the bottom first row of stockinette? There is really no contest here, I have to go with the graft.
The first step is to remake the hem correctly and transfer it up to the main bed. Knit one row in red to close the hem as usual and then remove it on waste yarn. Next, get the hem off the front – I am going to pull the last red row thread that joined the hem, leaving the loops of the first row of charcoal. Carefully rehang those charcoal loops on the machine on the same number of needles as hem was. Carefully unknit that row, from the side with the tail of yarn – it takes a bit of picking and undoing but it can be done. The yarn of that row is what I’m going to use to graft the two sets of stitches back together and the row of grafting replaces or duplicates the first row so you won’t be able to tell there ever was a problem. Knit this piece off on waste yarn, make sure you have a good inch on each piece. Now, sit somewhere comfy with good light and from the purl side, perform the graft.
BTW, so totally impressed with this yarn – it knits beautifully with a minimum of weights and no knots!!

Monday, February 26, 2018

rescue mission...

I wasn’t going to tell you this story – I felt like I not only had egg on my face, but it had dried! But I got an email the other day from my friend Tom – he had test knitted the Manfriend Hoodie for me and his new puppy chewed the cuff of his red one. When he was opening the sleeve seam to take the cuff off and replace it, he inadvertently snipped the wrong thread and now he has to re-make the entire sleeve! He was talking circular needles and stuff! LOL! Misery loves company!
the evidence!
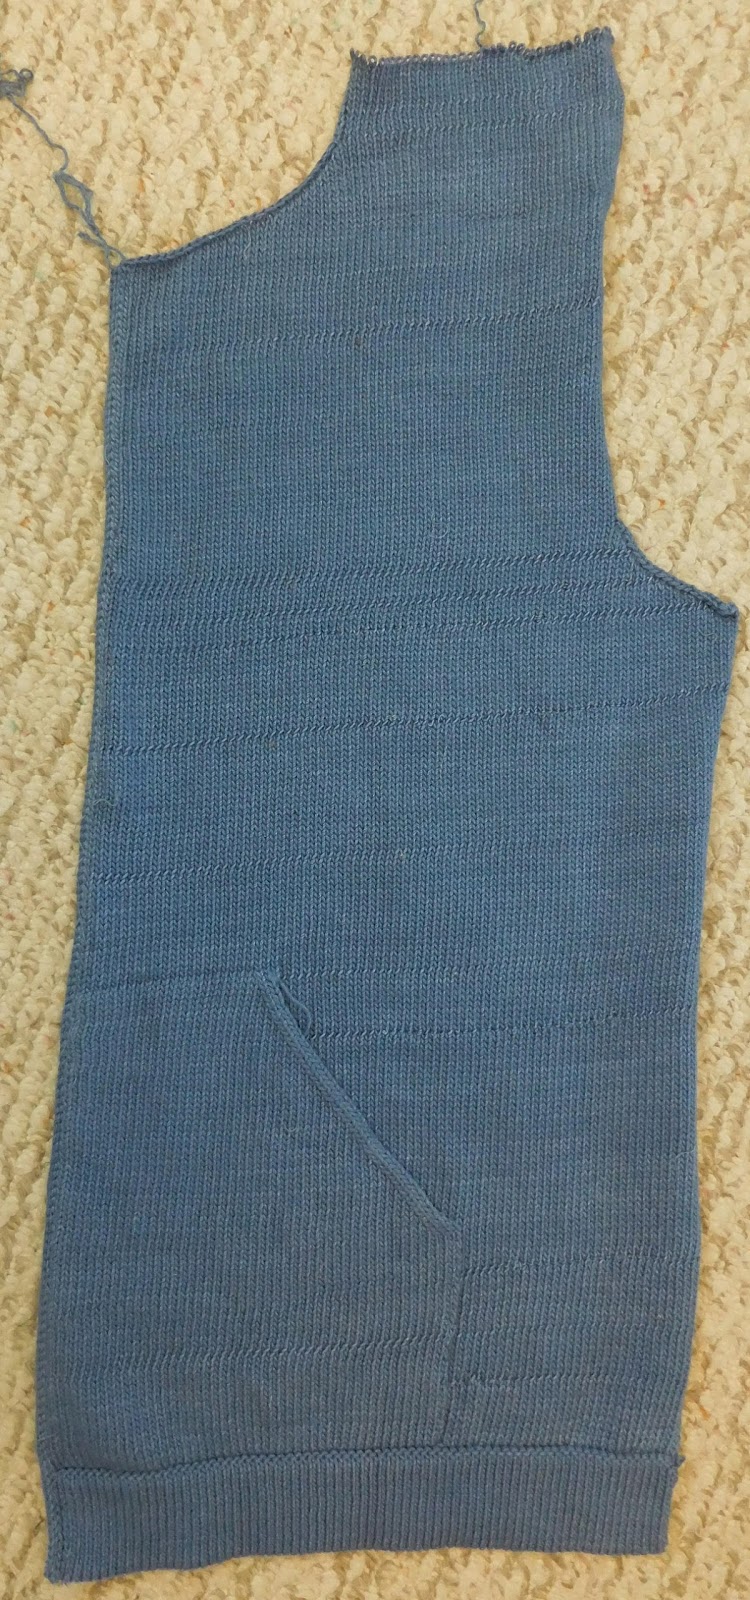
It brought this back to my mind. I was preparing for the Maritime seminar in Charlottetown, PEI and one of my classes was seaming on the machine so, killing two birds with one stone, I had all the pieces done for a denim blue hoodie that I was making for my friend’s hubby, Ray, so I could show the actual seaming in the class. I had knit like a mad fiend to get it all ready in time and must have been working on autopilot. Usually when I complete one piece, after taking it off the machine, I roll it lengthwise, yank to set the stitches, unroll it and give it a steam or press, depending on the fibre, to casually flatten it out and then look it over to make sure all is well before proceeding to the next step. Somehow, either I omitted this step or, ignored the fact there were ‘lines’ across this half of the front. I had the shoulders joined and one sleeve on to take to the seminar. When I was in the middle of the class in PEI, I sort of noticed them a bit but said to myself, ‘that will come out in the wash, proceed with the demo’. I put the other sleeve on, seamed the underarm, attached the hood and the stabilizing trim for the centre front, ready for the zipper. Technically, I wouldn’t have done that until after I washed the assembled garment but did it in the interest of presenting as much as I could.
When I returned home, I somehow overlooked the laundering – I guess I figured that this was like my 7th or 8th remake of the pattern at that point and I could guesstimate the number of stitches for the front edges without the shrinkage factor. I went ahead and finished the whole thing, even sewing in the zipper before I put it through the laundering, still not paying any attention to the ‘lines’. When I took the hoodie out of the dryer, it was like I’d been punched in the stomach! OMG! it was horrid! how could I have overlooked this? There were obvious flaws in the yarn that looked even worse!
I spent the rest of the day berating myself and the machine knitting population of PEI! Nobody said a word – that damn quintessential Canadian politeness!
fixed!
The next day, facing reality, I re-knit the front, checking several times that I was indeed making the right one, the left! Luckily, I had extra yarn and I keep very good notes of everything I knit. After it was done, I picked out the zipper and began the process of removing the left front. I realized the good thing about this pattern was there were only open stitches on the top of the sleeve and that RTR row after the shortrowing saved the stitches well enough so I was able to rehang it right on the machine and reknit only that row. And of course, the shoulders, but that was a piece of cake after the sleeve cap – everything else was totally cast off individually so removing the hood was not jeopardizing the neckline in anyway. Got ‘er done and back together in no time and didn’t admit it to anyone until now! 
 

Monday, October 2, 2017

multiple choice...

OMG! You spot a mistake in your lace transfers 6 or 8 rows below! What to do, what to do?
A. Thank the knitting gods you spotted it so soon!
B. Quit and drink wine!
C. Try to rip back only that section.
D. Rip back all 8 rows.
E. All of the above.
I went with E but not in that exact order. After spotting the mistake, I did try unravelling just the stitches of that portion for 8 rows but by then, you’ve got strings all over the place and you’re not quite sure what’s what, especially on this particular pattern because it’s a 24-stitch repeat. The hard part about ripping back lace knitting, whether it is hand transferred or lace carriage, is that you need to untransfer/put the stitches back to the row before, rip out 2 rows, untransfer, rip out 2 rows and keep track of what row you’re going to be on when you finish ripping…
For this project, I actually have 3 row counters, two on the machine and one on my KR11, which is connected to one of the row counters. Sounds complicated but I’ve got a problem with my row counters. Now, bear in mind they are getting quite old, at least 20 years on one anyway. One of them doesn't recognize the cable going to the KR11 but it counts reliably. The other one addresses the KR11 properly but it advances weirdly starting at row 19. Instead of clicking up to 20, it goes to 29 and then 39 and then randomly and if you're not aware of it, you'll never be able to figure out what row you're on! I have taken them apart to see if I could spot the problem but couldn't....I'll be ordering a couple of new ones! Anyway, when I'm ripping out, after pulling out one row, I pull out a needle at the end of the needlebed. Rip one row, pull out another needle...count the needles at the end and turn back the row counter.
 
Long story even longer, just to be safe, I did rip back all 8 rows, fix the mistake, reset all the row counters and continue!
P.S. If you have a question for me that you would like an answer to, please email me privately – I do not answer comments. ;-)