Showing posts with label ribber scarf. Show all posts

Saturday, July 16, 2016

aran-look scarf...

The Last Red Scarf  (Red Scarf  for Aids Awareness)
Machine: 4.5mm standard gauge with ribber. Knit on Silver Reed 580/SRP60N
Yarn: red Forsell Shamal 4 ply, 20% wool, 80% acrylic, 2520yds/lb (would be T7-8 stockinette) or any fine 4 ply yarn that knits a rib comfortably.
Gauge: Not really critical - Tuck Rib, T8/5, 24 sts and 50 rows to 10 cm/4 in.
FNR hem: Swing H5, all ns working, both beds. End ns on MB. Cast on WY, T4/4, K1R. Hang comb and one large weight in centre. Knit several rows. Set for circular and knit ravel cord in circular, 2 rows. CAR, set to knit both beds, both ways. RC000. Bring all needles out. MC, T3/3, K1R. Rack to H4, bring all needles out. T4/4, K1R. Rack H5. T5/5, K1R. T6/6, knit to RC008. Swing P. Transfer to MB, leaving 2 sts on RB (see stitch chart from yesterday) - all in work on MB; 10 out, 2 in work on RB.
Set back to Swing H. T8/5 Set to tuck rib:
Silver: set pattern to begin, punch card, release card. Electronic, inspection lite off. MB, cam lever to tuck, side levers back at triangle; RB, pick knob on tuck symbol, left set lever on 1, right set lever on 0.
Brother: set pattern to begin. MB, both tuck buttons in; RB, left cam lever down  to N, tucking lever to P, right tucking lever up to P-R.
Tuck pattern: 24 st X 18 row repeat.
SilverReed, enter as shown, white squares are tuck stitches.
Silver with DAK, have Main/X on white square.
Brother, enter as shown.
TIP: for this stitch pattern, if needle selection and needle arrangement is correct, there will be a tucked stitch on the main bed between the 2 rib stitches after the first row of pattern is knit.
Cancel tuck on last 4 end needles each side - Silver- move point cams in; Brother electronic, enter width that you wish the tuck to pattern to; other - pull all 4 edge ns out to cancel patterning before knitting the row (or not - it really isn't a big deal but I thought it looked nicer without the MB tucking into the longstitch...)
Bring 25-0-26 ns to work on main bed. Set to H5 and bring ns on ribber to work so outside ns are on MB - one less than knit bed. Set up and knit FNR hem as above to RC008. CAR. Download pattern (read punchcard or set up for pattern knitting as above).
Leaving 5 sts at each side for tucked longstitch facing, transfer RB sts to main bed except for the 2 either side of the vertical tuck line in stitch pattern that will be at #6Left and #7Right if you are using same stitch pattern.
Knit 715 rows or desired length (150 cm/5 ft) ending at suitable place in pattern, like middle of a diamond. Cancel tuck on both beds, K1R. Swing P, fill in empty ns on RB with heel stitch from MB. Swing H, T6/6, K7R. T10/10+, K1R.
Set for circular knitting. With waste yarn, T5/7, K20R circular. T5/5, FNR, K2R. Remove from machine.
This is a method to give the cast-off edge good elasticity and look similar to cast on edge. Block and steam, steaming WY as well, to set stitches. Remove last two rows of waste yarn to open the end. Fold waste yarn out. Using latch tool, start at side opposite to yarn end. Chain cast off with latch tool by picking up end stitch, put behind latch. Pick up next stitch from other side of WY and pull through. Continue going back and forth across row. At end, pull yarn end through to anchor. Remove waste yarn. Darn in ends.

Did you notice I didn't grade the tension at the end of the FNR hem? I found it just caused grief for the cast-off because of the tight stitches and really didn't make a difference in the look of the cast-off compared to the cast-on!
Analysis: This was really quick - I did it in less than an hour - and easy and made a very pretty scarf! I love the fabric - I used it before in Serial Stuff 2, Tuck Rib Cardi, which I still love and wear a lot - I think this has inspired me to knit it - the TRC,  again, perhaps incorporating the longstitch facings!
Red scarf for Aids Awareness count: 8!
Friday, July 15, 2016

the last red ribber scarf...

Take a tuck pattern, add a few rib stitches to make
vertical lines to stabilize the fabric, start off with a full needle rib hem with the racked cast-on, transfer to stitch pattern needle arrangement, add extra stitches on rib bed for tucked longstitch facings at edges to finish sides - you should be a ribber expert by the end of this! Hope you've been at least making swatches from the previous scarf patterns because you'll need some of the previous techniques - I warned that you might learn something!
FNR hem: Swing H5, all ns working, both beds. End ns on MB (one extra on MB than on RB). Cast on WY, T4/4, K1R. Hang comb and one large weight in centre. Knit several rows. Set for circular and knit ravel cord in circular, 2 rows. CAR, set to knit both beds, both ways. RC000. Bring all needles out. MC, T3/3, K1R. Rack to H4, bring all needles out. T4/4, K1R. Rack H5. T5/5, K1R. T6/6, knit to RC008. T7/7, K1R. Swing P4. Transfer to MB, leaving 2 sts on RB as below:
Tuck Rib - all in work on MB; 10 out, 2 in work on RB. (see below stitch pat. chart)
Set back to Swing H. CAL. T8/5, K1R (Brother, use this row to read/select pattern). Cancel patterning for the 4 outside edge stitches where the longstitch is. CAR. Set to tuck rib:
Silver: set pattern to begin, punch card, release card. Electronic, inspection lite off. MB, cam lever to tuck, side levers back at triangle; RB, pick knob on tuck symbol, left set lever on 1, right set lever on 0.
Brother: set pattern to begin. MB, both tuck buttons in; RB, left cam lever down  to N, tucking lever to P, right tucking lever up to P-R.
Tuck pattern: 24 st X 18 row repeat.
SilverReed DAK enter as shown, white squares are tucked stitches, have main /X on white square
Brother, enter as shown.
TIP: for this stitch pattern, if needle selection and needle arrangement is correct, there will be a tucked stitch on the main bed between the 2 rib stitches after the first row of pattern is knit.
Set to H5 and bring ns on ribber to work so outside ns are on ribber - one more than knit bed. Cast waste yarn in zigzag, hang comb and 1 large weight. Knit several rows, ending CAR. Switch to circular for the ravel cord, K2R. Cancel circular.  Rack to H4. RC000. Main yarn, T1/1, K1R. Rack to H5, T2/2, K1R. T3/3, K1R. T4/4, knit in FNR to RC010. CAR. Download pattern (read punchcard or set up for pattern knitting as above).
Leaving 4 sts at each side for tucked longstitch facing, transfer RB sts to main bed except for the 2 either side of the vertical tuck line in stitch pattern that will be at #6Left and #7Right if you are using my stitch pattern.
Knit desired length, ending at suitable place in pattern (middle of a diamond) CAR. Cancel tuck on both beds, K1R. Swing P, fill in empty ns on RB with heel stitch from MB. Swing H, T4/4, K8R. T9/9+, K1R.
Use WY in circular to end as for the Archaeology Scarf...

This is my last ribber scarf - I'll post the final pattern tomorrow or the next - I've run out of suitable red yarn so that's it for the ribber stuff! oh yeah, if you need/want the DAK file, email me at knitwords@shaw.ca


Saturday, June 11, 2016

One-R-T...

I'm feeling the pressure! The 15th of the month is coming and I know I gotta do that red scarf thing and I hate to disappoint - I know you're anxious with anticipation and, I'd like to get it out of the way because I have other things to put on this machine. Rhiana, my granddaughter, was over the other day and asking for her panda sweater! I was hoping to put it off until the fall - thought it might be a back-to-school thing for her but she wants it now and was giving me a gentle reminder. I also figured she wouldn't like the yarn I chose - I thought it was going to be too green, not turquoise-y enough but she loved it! It's the same colour as her soccer uniform! What was I thinking? And, I have a couple of ideas for a new dress that I want to get to for going to DFW in October - don't worry, I am working on the Church Cardi so this is just in-betweens!
One-Row-Tuck - this is such a great technique, one of my favourties! It has a nice texture, looks good from either side and with the plain longstitch bands on each side to finish the edges automatically, I think it makes a nice scarf and a great learning project if you haven't tried either of these techniques. I think I've talked about both here (one row tuck and longstitch facings) before so do a search to find more if you're intrigued.
I have included my chosen stitch pattern here - if you want the DAK file, email me at knitwords@shaw.ca - I won't hold my breath though!
So here's the Red Scarf for Aids Awareness for June! I'm calling it
 'One-R-T Scarf for June'.
End needles on RB. Use number strip on RB to select needles, and count needle spaces on RB only. MB sts are included as they occur within outside RB needles. Either side can be right side. Pattern is tucking on MB to left and knitting all sts to right.
Program as below. Set cam lever to tuck.
Punchcard 24 sts X 48 rows, make as shown, making holes for grey squares and leaving white blank, adding double row of holes top and bottom to join card.
Circular Hem. Swing H5. Arrange for full needle rib, end ns on RB. Cast on WY. Knit several rows. Set to circular. T4/6, ravel cord, K2R. Move carriages to left without knitting. Bring ns all out. This will cancel the circular setting and make a zigzag row (without having to change the settings back and forth). MC, T2/2, K1R. Hang comb and one weight. RC000. Knit circular, grading tension by increasing one full number for each row to T8/10, RC014. Swing P. Transfer sts to MB, leaving outside end sts on RB for longstitch facings as directed. Swing H. Program pattern and use next row to read/select. T9/7, K1R. RC000. Set to tuck.
Plain Longstitch. The stitch is single bed tuck on the main bed, but longstitch self-facings require a few (6-7 at each side) sts on the rib bed. Knit with RB engaged. The longstitch is created by needles on RB knitting in one direction only, when carriage is passing to left in this case. MB, set as for pattern (tuck).
RB Settings for Longstitch:
Silver, left set lever 1,  right set lever 0.
Brother, left cam lever to N, right cam lever to PR.
Yarn: Yeomans Panama - I would stockinette this at T7 but with adding tuck, wanting the scarf to be soft and making the yarn to go further, I'm knitting the main bed at T9. The longstitch facing is variable depending on your yarn - I used 7 on the rib bed because they are knitting only every other row - try it out first of course ;-) - if the facing is too tight it will be shorter at the sides than the main fabric. If too loose it will curl inward.

SCARF: Bring 25-0-25 ns to work on main bed. Set to H5 and bring ns on ribber to work so outside ns are on ribber - one more than knit bed. Cast waste yarn in zigzag, hang comb and 1 large weight. Knit several rows, ending CAR. Switch to circular for the ravel cord, K2R. Move carriages to left and make hem as above to RC014. Transfer sts as above. Download pattern (read punchcard or set up for pattern knitting as above). Knit 600 rows or desired length (150 cm/5 ft), ending CAL after the plain row. Now, this is the only hard part - we need to get everything back in work to make the circular hem. Bring the rib bed needles to work to fill in between the facings. Not really hard, I should have said just a little bit of work. Set the ribber back to Swing P so the needles are directly opposite and using the single prong tool, hang the heel stitch from the main bed stitches on the opposite rib bed needle - you could just do a zigzag row at low tension over the whole thing and hope for the best - it will work, but won't look so great - your choice! After you have all the rib needles filled in, set to circular. T8/10, K2R. Grade tension down by one number to match beginning hem. RC014. Cancel circular. Zigzag, T7/7, K1R.
With WY, T5/5, K20R circular knitting. FNR, K2R. Remove from machine. Steam WY to set stitches. Remove last two rows to open the end. Fold waste yarn out. Using latch tool, start at side opposite to yarn end and chain cast off by picking up end stitch, put behind latch. Pick up next stitch from other side of WY and pull through. Continue going back and forth across row. At end, pull yarn end through to anchor. Remove waste yarn. Darn in ends.
Analysis: This was a very quick knit! I did find that yarn spray helped eliminate/reduce the clunking at the left side on every other row when the rib bed needles were needed. No close knit bar was required. I have used these techniques on multiple garments/patterns both in KNITWORDS and in my Serial Stuff series. I hope you love it as much as I do!
Red Scarf for Aids Awareness count: 7

Tuesday, May 17, 2016

archaeology...

I was digging up bones and my knitting room is littered with scraps of false starts! The red lace weight alpaca I was planning to use was either breaking randomly - not sure whether certain balls of that yarn were just like that - not very strong or what,  but my first attempt got me to about row 40 and then everything dropped. The next one, I got to about row 150 and it all fell because the yarn broke again. I then tried adding in a very thin spandex/lycra thread as a binder. The first one was ivory and it worked but the colour showed too much. I had a grey lycra that worked nicely and blended well, so I started again with that and got to about row 200 when the red alpaca broke halfway across, but I couldn't rehang from just the lycra. I abandoned that idea and yarn and switched to the red cotton from my last scarf (Quilted Northern). I was zipping along and about row 500 I messed up and instead of just switching the ribber tension dial, I flipped up the set lever (like for circular knitting -what was I thinking???) and on the second pass, it began dropping off the ribber stitches! Fudge, honey and sugar! I quit for the day!
I began again this morning with a fresh perspective and knocked the whole scarf off in an hour. It's pretty easy once you learn to count to 25 and you're fresh! There are built-in signals between times to change it up. There are always 5 rows of the pintuck, beginning on the right. Then, with the carriage at left, switch the rib dial back to main tension and set to tuck. The first row of each tuck section is a plain row and even if you forget to switch back to tuck it knits both beds anyway because of the plain row in the stitch pattern. The sound of the carriage should alert you to change. At the end of the 23 rows of  tuck patterning, there is another plain row, to eliminate any tucks and make the pintuck clean and you should notice a change in the sound the carriage makes between the tuck rows - the tick, tick tick of the tucks - and then solid, (no ticks) for the plain. So I'm calling the May ribber scarf:
Archaeology Scarf  (Red Scarf  for Aids Awareness)
Machine: 4.5mm standard gauge with ribber. Knit on Silver Reed 580/SRP60N
Yarn: red 2 ply (3/14) cotton,  2900m/350g (would be T2-3 stockinette) or any light weight yarn that knits a full needle rib comfortably.
Gauge: Not really critical but 50 sts and 60 rows of tuck and pintuck as above, T4/4 = 15 cm X 13 cm.
Insert close knit bar. See previous post for stitch chart.
Punchcard: punch in reverse to shown: make holes for all the white squares and leave black squares unpunched. Add double row of holes top and bottom to join card. SilverReed punchcard: Lock card on row 1. Read card. CAR. Unlock card. *Set cam lever to slip, side levers to triangle. T4/8, knit 5 rows ( rib bed only - makes pintuck); set cam to tuck, T4/4, K25R*. SilverReed electronic: make mylar as shown, lite #1 right is on, N1 cam at 0, point cams at edge of ns in work. *set to S/J (slip). T4/8, knit 5 rows ( rib bed only - makes pintuck); set cam to tuck, T4/4, K25R*. Brother electronic: enter as shown and use KHC light on, to select opposite needles for patterning. *Both slip buttons in. T4/8, knit 5 rows ( rib bed only - makes pintuck); set both tuck buttons in to tuck, T4/4, K25R*.
Repeat this *-* 30 row sequence throughout for all machines.
Bring 25-0-25 ns to work on main bed. Set to H5 and bring ns on ribber to work so outside ns are on ribber - one more than knit bed. Cast waste yarn in zigzag, hang comb and 1 large weight. Knit several rows, ending CAR. Switch to circular for the ravel cord, K2R. Cancel circular. RC000. Main yarn, T1/1, K1R. Rack to H4, T2/2, K1R. Rack back to H5. T3/3, K1R. T4/4, knit in FNR to RC010. CAR. Download pattern (read punchcard or set up for pattern knitting as above). Knit 840 rows or desired length (150 cm/5 ft) and end with last pintuck. FNR, T3/3, K7R. T2/2, K1R. T1/1, K1R, ending CAL. Transfer all to main bed. Measure out 3X width of ns in work, cut yarn and backstitch cast off (or do the one you like best from the previous scarves). Darn in ends.
If you have any questions or problems, please email me at knitwords@shaw.ca
Analysis: This is a very cool fabric, quite stretchy width-wise, compared to last one! I love the mixed textures and I'll be using it again for something, maybe a slouchy pullover in a lightweight cotton or alpaca - it has a good width to it and the resulting fabric is relatively thin and lightweight with good body...or I could break out the WCD again...
Red scarf for Aids Awareness count: 6

Saturday, May 14, 2016

digging up incredibly old stuff...

My next pattern for the red scarf challenge is an oldie! I had this design published in 'Machine Knit America' Vol 4 No 6, May/June 1995 - OMG, MAO! that's more than 20 years ago - I guess I'll soon have to stop lying about my age! ;-)
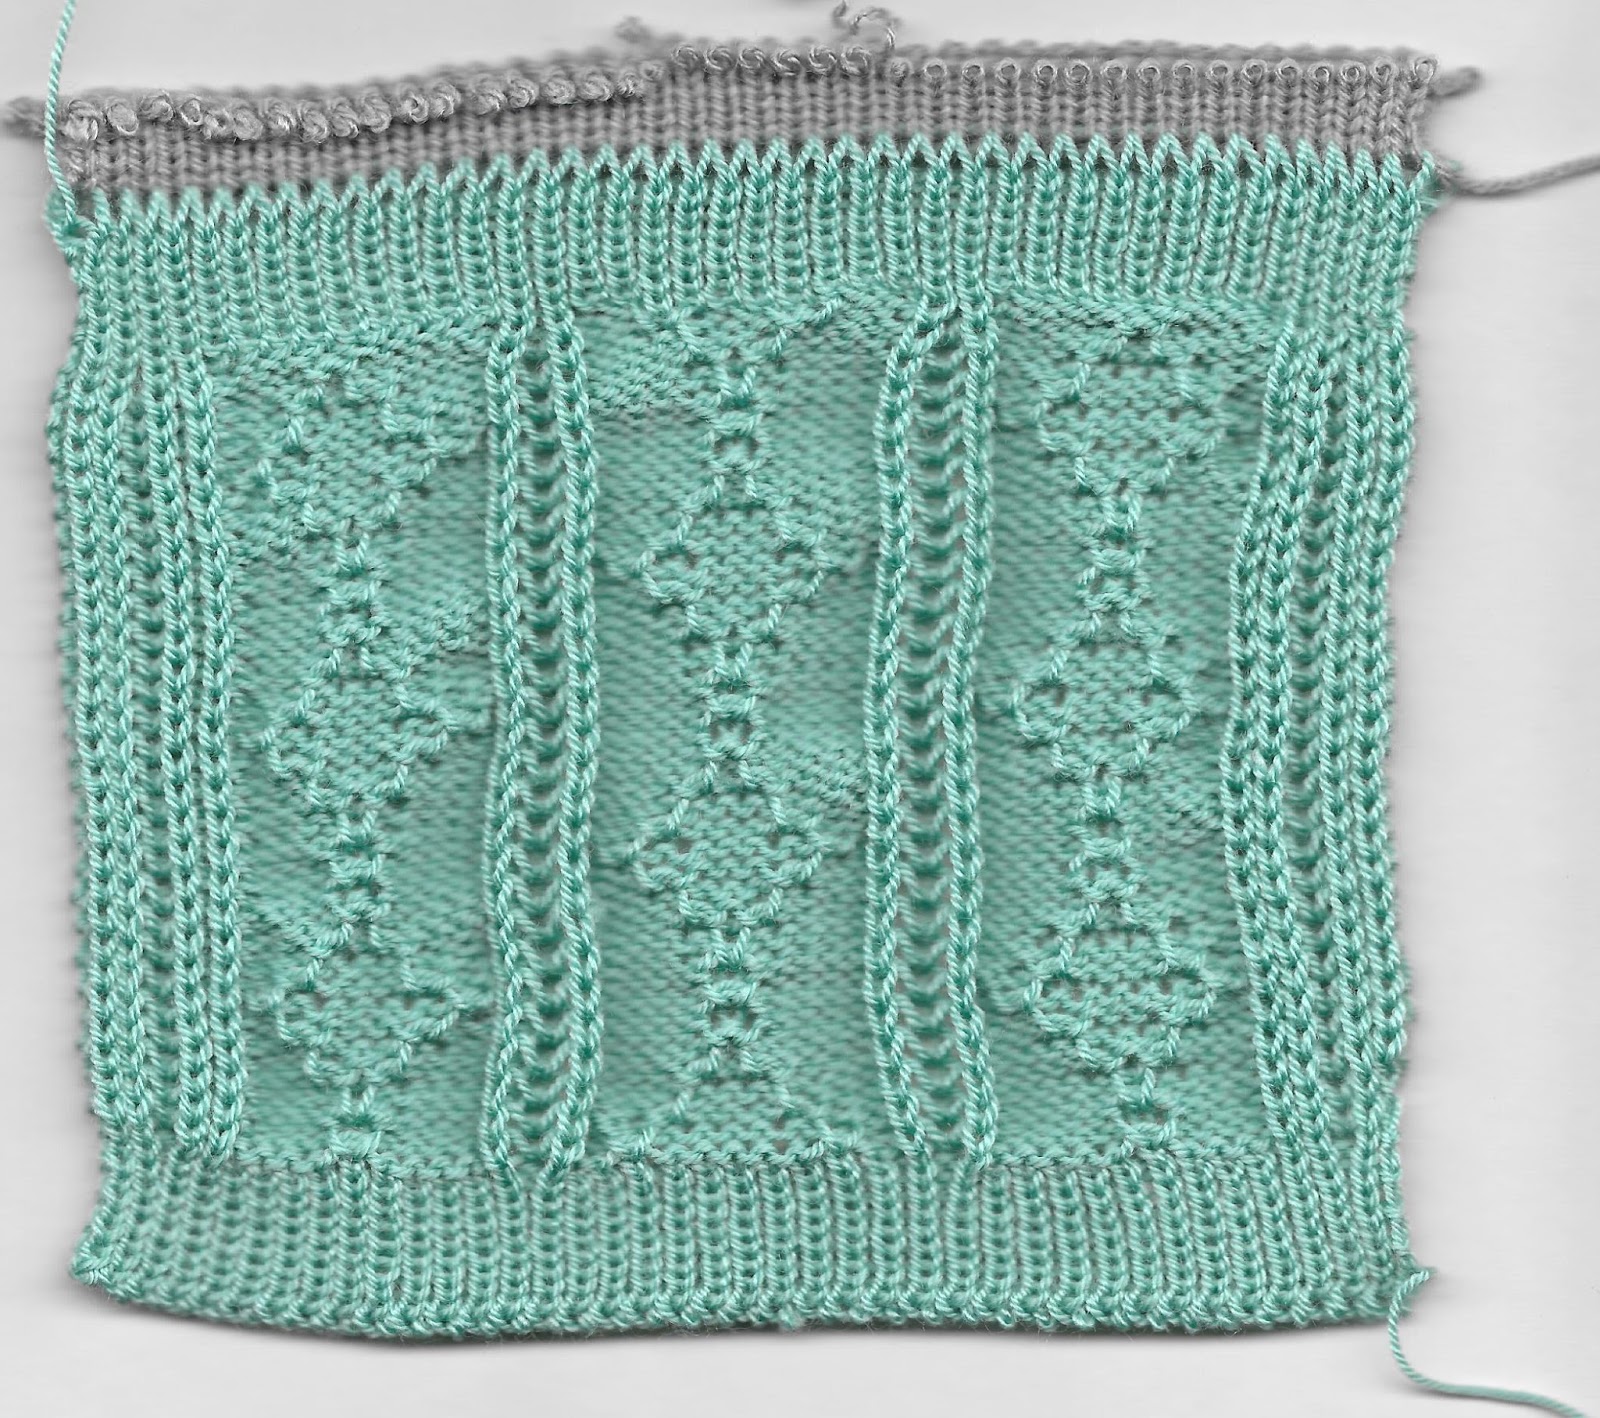
I still have the cardigan - it was my very first use of woolray (now known as WCD/wool crepe deluxe) and I thought the design was brilliant then and still do actually, although the shape of the garment could use a revamp! The reason I've chosen it now for this ribber scarf is for the teaching value of the stitch pattern - it incorporates a neat little automatic pintuck, made by stitches knitting on the rib/front bed only, ignoring the back bed for 5 rows. Note, the tension setting on the ribber here for these 5 rows only  is 4 numbers higher than on the main bed because you want these stitches to be slightly larger than what the main bed stitches only would be (going back to that circular/tubular thing from the first scarf). Then you set for tuck and a plain row of FNR on both beds closes up the pintuck before going into the tuck pattern which alternates between vertical lines and a chevron but is controlled by the stitch pattern. 
Also the pattern shows slightly on the back side/side away making it nice for the scarf project! Hope you have fun with it and learn something about your machine!
Notes for programming pintuck and punch tuck rib pattern:
Punchcard: punch in reverse to shown: make holes for all the white squares and leave black squares unpunched. Add double row of holes top and bottom to join card.
SilverReed punchcard: Lock card on row 1. Read card. CAR. Unlock card. *Set cam lever to slip, side levers to triangle. T4/8, knit 5 rows ( rib bed only - makes pintuck); set cam to tuck, T4/4, K25R*. Repeat this *-* 30 row sequence throughout.
SilverReed electronic: make mylar as shown, lite #1 right is on, N1 cam at 0, point cams at edge of ns in work. *set to S/J (slip). T4/8, knit 5 rows ( rib bed only - makes pintuck); set cam to tuck, T4/4, K25R*. Repeat this *-* 30 row sequence throughout.
Brother electronic: enter as shown and use KHC light on, to select opposite needles for patterning. *Both slip buttons in. T4/8, knit 5 rows ( rib bed only - makes pintuck); set both tuck buttons in to tuck, T4/4, K25R*. Repeat this *-* 30 row sequence throughout.
My swatch (20-0-20 ns) light jade Tamm Perla MT -  would be T4 stockinette
Insert the close knit bar.
Bring 20-0-20 ns to work on main bed. Set to H5 and bring ns on ribber to work so outside ns are on ribber - one more than knit bed. Cast waste yarn in zigzag, hang comb and 1 large weight. Knit several rows, ending CAR. Switch to circular for the ravel cord, K2R. Cancel circular. Rack to H4. RC000. Main yarn, T1/1, K1R. Rack to H5, T2/2, K1R. T3/3, K1R. Continue in T4/4 (except for pintucks - see above). Knit in FNR to RC010. CAR. Download pattern (read punchcard or set up for pattern knitting) and I did one and a half repeats, the final pintuck and then went into FNR again for the end. T4/4, K7R. T3/3, K1R. T2/2, K1R. T8/8, K1R. Yes, the last row is zigzag. Change to circular, ravel cord, K2R. Waste yarn, K20R, zigzag, 2 rows...
You should know the cast off by now...
OOOPS! I see I've made a mistake in entering my stitch pattern - I'll fix it on the real thing - the stitch pattern shown here is correct - on my swatch, the chevron is off - no big deal but I thought I'd point that out incase you're wondering why yours isn't exactly the same - I thought it was a 12 stitch repeat but it's an 8...
If you need the DAK file or any help with this, please email me at knitwords@shaw.ca
I'll post the actual pattern and photo of my red scarf tomorrow or the next day hopefully.

Wednesday, April 6, 2016

Slip stitch and the double bed...

I know you're dying to see what the next red scarf is going to be and because I'm that committed to this challenge and very conscious of deadlines, even self-imposed ones, I'm working on it now (also going to visit family in Toronto for a week so I'll be away until the 15th) and I hate to think you were waiting for this and I didn't deliver - so here we are, early!


side facing top portion
is correct
side away
If done properly, side facing is right side, but no worries, even done wrong it still looks fine! My swatch (20-0-20 ns) in gold Yeoman Yarns Brittany - would be T2 stockinette on the single bed, so I've used T2/4 for the double bed. Is there a reason that the ribber is 2 full numbers higher, you ask? Yes. It goes back to that circular knitting thing where on the Silver Reed the ribber needs to be 2 full numbers higher than the main bed to have the stitch size match, so if you did the circular thing ('are you up for a challenge?' Jan 18/16)  you can gauge this to what your circular tension difference was. If you use the same number on both beds, the fabric will be too tight on one side and will curl inward. If your swatch is laying flat without having to press or steam, you're good.
use double length
Set main bed to slip, the white squares are knit, the grey squares slip and the rib bed stitches knit every row (with DAK, main is on the grey square). This creates little pockets of raised areas on the ribber side and the pattern still shows up on the knit side/side away so it makes an interesting two-sided fabric. Slip stitch makes a narrow, non-stretchy fabric so  a plain circular hem will match the width just fine and we don't need to worry about a stretchy cast-on (or off) - see below for MAO-approved method.
Notice the difference in length in the swatch - the bottom side is the 'wrong' way, and the row gauge is 57 rows to 10 cm/4 in. - the top portion is the way I really wanted it to be, therefore the correct method, and the row gauge is 75 rows to 4 in/10 cm. FYI, the stitch gauge is exactly the same in both, 35 sts to 10 cm/4 in.
Oh, and use that close knit bar again...and you know, if you want the DAK stitch file, email me at knitwords@shaw.ca
Machine: 4.5mm standard gauge with ribber. Knit on Silver Reed 580/SRP60N
Yarn: red 2 ply (3/14) cotton,  2900m/350g (would be T2-3 stockinette) or any light weight yarn that knits a full needle rib comfortably.
SLIP DIAGONALS Red Scarf  for Aids Awareness.
30-0-30 ns, arrange for Full Needle Rib/ZigZag (all needles working, extra one on rib bed so both end ns are on non-patterning rib/front bed.
Swing H5 (centre, half pitch). Cast on waste yarn, hang comb and weights, knit several rows, ending CAR. Set to circular, ravel cord, K2R. Place carriages on left side. Bring ns out - this cancels the circular setting just for this row, MC, T1/1, K1R. RC000. CAR. You should be still set to circular.
T1/3, K2R.
Grade tension up by one dot per row on each carriage to T2/4. Knit to RC010.
Download your pattern, set to slip on MB. Knit 1125 rows. Change to circular. K2R. Grade tension down by one dot to match beginning hem. RC010. Cancel circular. Zigzag, T4/4, K1R.
With WY, T5/5, K20R circular knitting. FNR, K2R. Remove from machine. Steam WY to set stitches.  Remove last two rows to open the end.  Fold waste yarn out. Using latch tool, start at side opposite to yarn end and chain cast off by picking up end stitch, put behind latch. Pick up next stitch from other side of WY and pull through. Continue going back and forth across row. At end, pull yarn end through to anchor. Remove waste yarn.
You know I'll post a photo of my finished red one next week!
TTYL!

Monday, March 14, 2016

'cheater' scarf for March AIDS awareness challenge...

I was going to call this 'easy peasy' but it really was like cheating, so I'm going with that! The cable pattern didn't show up so well in my ribbon yarn, but it is there and it's the right colour!
Notes for programming English Rib in Pattern:
Punchcard: make holes for all the gray circles and leave white squares unpunched. Repeat length two times or as necessary to make card long enough to join. Add double row of holes top and bottom to join card.
SilverReed punchcard: Lock card on row 1. Read card. CAR. Unlock card. Set cam lever to tuck, side levers to triangle. Knit.
SilverReed electronic: mark mylar opposite to shown, lite #1 right is on, N1 cam at 0, point cams at edge of ns in work. Cam lever to tuck. CAR to begin tuck.
Brother punchcard: Lock on row 1, select to right, tuck buttons in, begin tuck knitting to left.
Brother electronic: enter as shown.

electronic cable pattern that I used
Machine settings: All machines, rib/front bed set to knit both ways. Tucks are on knit/back bed, end needles should be on rib/front bed. After reading/selecting pattern, set to tuck.
(for more info, see KW#38 Double Talk)
'Cheater' English Rib-in-pattern Scarf
Machine: 4.5mm  with ribber.
Yarn: lace weight or something fine, that you would stockinette knit at T3-5. I used 'Gummy' from Silk City. See last few blogposts/red scarf patterns for Aids Awareness for more details.
Finished weight: 110g
Insert close knit bar.

24 st punchcard version
Bring 36-0-36 ns to work on main bed. Set to H5 and bring ns on ribber to work so outside ns are on ribber - one more than knit bed. Cast waste yarn in zigzag, hang comb and 1 large weight. Knit several rows, ending CAR. Switch to circular for the ravel cord, K2R. Cancel circular.  Rack to H4. Main yarn, T3/3, K1R. Rack to H5, K1R. Download pattern (read punchcard or set up for pattern knitting - it should correspond with tucking in pattern as you move carriage to the left, plain row of all stitches knit when passing to right). CAR. Set for tuck on knitter). Knit 1200 rows or desired length (150 cm/5 ft) and end with  1 row T4/4 ZZ, CAL. Transfer all to main bed. Measure out 3X width of ns in work, cut yarn and backstitch cast off.
Darn in ends.  
If you need the DAK file or any help with this, please email me at knitwords@shaw.ca
Analysis: This was the quickest, easiest scarf yet - the end stitches knit perfectly and took no babysitting, there was no counting and switching back and forth between techniques - I would certainly make this again, especially if I had a cone of red Tamm Perla!
Red scarf for Aids Awareness count: 4

Monday, February 15, 2016

trust your swatch....

You did make one, right? My swatch, the one with the hole at the end, (30 sts X 80 rows) when I measured it the first time, just after I blew that cast-off, (which was about 3 hours off the machine) was 13.5 cm (2.22 sts/cm) wide by 11.5 cm (6.95 rows/cm) long. The next day, a full 24 hours after (and I steamed it because of the rayon/viscose content), it measured 12 cm X 11 cm - that may not seem like a lot on a small swatch but really would be significant when you multiply that out for a larger piece. When you are knitting the actual scarf and your comb is hitting the floor for the third to fourth time, you really start to question your measurements and start to second guess the length especially, but believe me, the next 24 hours will make the difference!
Oxymoron Scarf
Machine: 4.5mm  with ribber.
Yarn: lace weight or something fine, that you would stockinette knit at T3-5. I used 'Gummy' from Silk City. See last few blogposts for more details.
Finished weight: 110g
Size: 6 in X 60 in/15cm X 150 cm
Bring 30-0-30 ns to work on main bed.
Set to H5 and bring ns on ribber to work so outside ns are on ribber - one extra from knit bed.
Cast waste yarn in zigzag, hang comb and 1 large weight.
Knit several rows, ending CAR.
Switch to circular for the ravel cord, K2R.
Rack to H4. Main yarn, T3/3, K1R. Rack to H5, K1R. 
Set for English rib on knitter, K18R. Cancel that and at Zigzag, K2R.
Set to tuck EOR on ribber, K18R. Cancel that and Zigzag, K2R.
Repeat for desired length (1000R) and end with 1 row T4/4 ZZ, CAL. Transfer all to main bed. Measure out 3X width of ns in work, cut yarn and backstitch cast off.
Don't forget to remove the close knit bar unless you are making this again!
Darn in ends.
Analysis: I would certainly make this scarf again using a different yarn, something smooth and round, with better stitch definition like Tamm Astracryl or Perla.
It's not too late to join in!
Red scarf for Aids Awareness count: 2

Thursday, February 11, 2016

keeping me on my toes...

Yesterday, as I was posting that last photo, I knew I should be adding more info - my challengers are keeping me on task! :-)
Alysha wrote: I saw your pic on the blog of how you rolled up the scarf around the comb and just used claw weights.  Is that enough weight when you take off the barrel ribber weight?  I often wonder if gauge is affected and how best to keep the weight even after it hits the floor.  When rolling up the work, I can get a ribber weight on the ends, but not in the center. 

Actually, you do need to look real close at yesterday's photo and there is a large ribber weight in the centre, the hook poked in from behind, hanging on the top of the bar. When you put it in behind, it holds the rolled up fabric on the bar - because I am working on this and it is increasing in length quite rapidly, that weight is only there for a brief couple of minutes and won't do any lasting damage to the fabric. If I leave a ribber project (see right), I take off the weights and let the whole thing relax - leave the comb in and then rewind/rewrap it when you begin again. In this photo, note the small ribber weights on the sides of the bar, positioned from the back of the bar (instead of the one large weight in the centre). Yesterday I couldn't 'find' the second small ribber weight and resorted to using the large one in the centre (the 2 small ones are close enough in weight to equal the large one, whereas 2 large weights would be too much). I prefer this method of weighting my ribber work rather than trying to rehang the ribber comb after the piece gets too long - I have found that quite difficult to get it in without damaging the stitches and it usually stretches out that next row and leaves a noticeable line. The claw weights in the photo from yesterday are placed at  the edges of the work and I do move them up every 40 rows or so - I prefer that to using the side hangers/sevens - those I find will stretch out the edges unevenly.
view from behind machine
view from front
BTW, also forgot to mention that when knitting the 'tuck on ribber' portion,  I bring the left side end needle (on the ribber) up on every other row when carriage is at right - this cancels the tuck at the end of the row and prevents the stitch from dropping at the beginning of the next row...
I hope I haven't made this sound too complicated  - I am finding this scarf is actually a quicker, easier knit than the circular one!

Wednesday, February 10, 2016

a hole in one...;-(

Since this isn't golf, that cast-off didn't work...
On my red swatch, when I was doing the final cast-off by hand, somehow, without realizing it in time, I missed a stitch and after I pulled out the ravel card and tugged on the edge to test it, guess what - boom! not just one dropped stitch! so, particularly with these finer yarns that I am using, that cast-off is benched. To be honest, that is one is really only for the purist. I'm fine with just transferring all to the main bed and doing the back stitch cast-off which gives the stretch needed for this project. I did make another small swatch to test it out - after one zigzag row at the end, so there were single stitches on each bed, I transferred all to the main bed and began the back stitch cast-off - it was a bit of trouble to make sure you were going through both stitches so for the last half, I carefully knit the back bed stitch through the stitch in front which would be the ribber stitch, leaving only one stitch on each needle and then the back stitch worked fine and looked pretty good. I didn't knit a row after transferring up because that would have made an extra stockinette row that would have showed on the cast-off.

Knitting the actual scarf, I did 18 rows, tucking on the main bed, 2 zigzag rows and switched to tucking on the ribber, 2 zigzag rows...but after a bit, I kept getting confused after the zigzag rows as to whether I should be tucking on the main bed or the rib bed. I thought about it for a minute and thought, hummmm...I need to hang something that I can move up and down to remind myself which step I was on. I spotted my prize, little green clippy that my friend Jane gave me - it was perfect to clip on the scarf for the rib part and then move up to the knit bed and clip on something up there - it was like having Janey sitting on my shoulder, like an angel, telling me what to do!  ;-) Happy day!
