Saturday, December 26, 2020

neckline options...

Back done, check! I had a starting plan. Was going to still make this a vee neck but not quite as deep as the original. While knitting the Back, had a chat with sister and she indicated that a round neck would suit her fine, so she could wear it with or without a shirt under. 


Now that I’m going with a high, round neck, here’s an option – use pins to rough out the new neckline to give a better idea of what will work. After the pins are in place, hold it up to your shoulders and look in the mirror to check how low/high the front neckline will be and adjust if necessary. Here, it’s easy to count back the cables (every 6 rows right) to find your optimum starting row! It will look better if there is at least 2 rows or half the cable before you begin shortrowing/shaping the neckline. Remember, there will be a plain row knit to get rid of the shortrow wraps and maybe another before the actual neckband.


After the agony of fixing that misplaced column of cables, and getting the Back off the machine, I noticed there were only 12 rows before adding in the second columns, and then 18 rows on all the next ones. Duh! I did have it written down – incorrectly, turns out! Fixed that on the Front and did 12 rows on every one, making the chevron nicer – not that anyone will notice! AND, just like I thought, turning the cables to the centre makes no difference – you’d never notice it on the finished garment, provided there were no esses/mistakes!

Safe and happy seasons greetings!


Friday, December 18, 2020

upping my game?...

Last week while I was playing with socks, I was also pondering how to elevate that Take a Turn pattern. After all, I wrote the pattern and called it Advanced Beginner (because of the extra detail and information included) and maybe somewhere I may have offered some changes or alternatives, like making it plain, without the cables, especially if you had not made a MAO pattern before. 

I no longer have the original garment – must have given it away and I plan to make it again for myself but this one is for sister Janet, who is quite a bit shorter than yours truly and a bit smaller across the shoulders. In the original, there were cables across the back, all beginning at the same time for a straight, yoke effect. I’ll be honest, it was easier to write the pattern that way and get you used to the cables and tuck rib without having to write 6 pages…then once you mastered that, staggering the cables for the front was easier to explain. Also, in the original, the cables were all turned the same way, again easier to explain and reduces the chance of error. Bearing in mind I’m giving this away, I don’t want to go whole hog or anything but I think I’m in a good mind space right now to add a little extra so, on the Back, I went with the chevron effect and decided to turn the cables to the centre, so the left side of 0 goes left to right and the right side opposite.

 I don’t think I’ve really shared this in detail before but when making something that has vertical lines, I try to plan it so that I get a full, straight line at the armhole side, after the shaping, where it goes straight up to the shoulder.  Making a size smaller than the first size (the pattern has nine cables across, spaced with seven plain stitches between) and because the shoulder width here was less, I’d end up with half a cable at the edge – not good. I respaced the cables with only five stitches between, counted them out, checked on the machine by pulling out the needles, wrote them down, before even casting on and I was golden! Somehow, in the actual execution, my enthusiasm got in the way of my careful planning and as I was about to add in the fourth cable, I realized that I only had 4 sts between the last two cables. Big swear, big swear! It’s wine time!

Next day, after tossing and turning all night, trying to convince myself to just complete it the way it was, I thought I could try to just undo those stitches - after all it was only 20 rows…Yikes! Nightmare city! Kids, do NOT attempt this at home! There were 6 stitches, but it needed to be moved out one stitch so there were actually 8 sts unravelled!

I was concerned about the underarm section, which in all my cleverness I had shortrowed and was worried about loosing that because I only needed to unravel halfway through that. If you’ve ever tried to unravel cables across the row, you know it is just as hard to un-cable! I should have taken my own good advice and either scrapped the whole thing or at least, dropped it off, unravelled back to the start of the underarm and rehung it. Would have been quicker. No worries! I’m just putting in time anyway, right?


Friday, December 11, 2020

over-soxed?...

Never! Set aside the ‘tawny pink’ sleeves for Janet’s Take a Turn.
There’s a cably Aran project in that blue alpaca hanging on the LK…
none of it abandoned, just set aside for a minute or so. I realized I needed to do some socks and I know I’ve probably over-sox-talked over the years but here goes me again! I have a very dear friend in Indiana – I’ve mentioned her before https://knitwords.blogspot.com/2008/10/middle-of-nowhere.html.

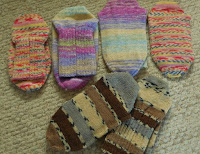
Anyway, I thought maybe this might give someone some inspiration. She’s (my friend) getting on in years and is on medication that has caused weight gain and very swollen feet. I made these socks for her, using my Warmup Sox pattern – you can still request it  https://knitwords.blogspot.com/2019/10/crazy-legs.html

She’s normally a ladies size 8 regular so what I did was knit the same sock but bumped up the stitch size to make them softer and loose, especially the ribbed cuff so it won’t feel tight on her ankles. The rib is knit at T7/7 and the foot is T8/10. I went with the largest width size (40-0-40 ns) but same rows for length of the rib and the foot. Two pairs, along with a package of digestive cookies that she loves - in the mail!

While I’m at it, making more socks – ankle, knee, reading, whatever you call them,  I love making socks! Christmas is coming! Stay safe!