skip to main |
skip to sidebar
 After
the dust settled on Lipstick and Smoke,
the remaining yarn tally of my Cotton Tale 8 was charcoal, 194g; silver, 292g; black,
350g; white, 400g. The garment weight of L&S is 750g. As I was finishing
up, I was pondering my next project. White is the largest single amount and you
know I love lace. I still did not have a really perfect white summer cardi. I
want to take my raglan shape, add the extra wide full-fashioned decreases from Rich
Raglan (Serial Stuff 2), use the lace stitch pattern of Sampler Lace from KW#12 and the variable
here will be the bands. I am picturing a nice, half sleeve raglan cardi in a mixed-up
version of the lace sampler with white or possibly black or red bands all
round. My pattern for Rich Raglan is
based on the fact you may not have enough of the main colour for the bands so
they are all added after in case you need to switch colour.
After
the dust settled on Lipstick and Smoke,
the remaining yarn tally of my Cotton Tale 8 was charcoal, 194g; silver, 292g; black,
350g; white, 400g. The garment weight of L&S is 750g. As I was finishing
up, I was pondering my next project. White is the largest single amount and you
know I love lace. I still did not have a really perfect white summer cardi. I
want to take my raglan shape, add the extra wide full-fashioned decreases from Rich
Raglan (Serial Stuff 2), use the lace stitch pattern of Sampler Lace from KW#12 and the variable
here will be the bands. I am picturing a nice, half sleeve raglan cardi in a mixed-up
version of the lace sampler with white or possibly black or red bands all
round. My pattern for Rich Raglan is
based on the fact you may not have enough of the main colour for the bands so
they are all added after in case you need to switch colour.
 I made a
quick swatch of the lace at T7 with the lace carriage – just to be clear, this
yarn is so nice, I really do love it – it is about the same weight as Bonita (I
have used extensively with lace carriage!) which is a mercerised cotton but this
washes up very soft and seems a little thicker than Bonita, so in comparison, Bonita was at T6
with my Silver Reed lace carriage and I’ve decided to try T7 with Cottontale 8
(Bonita in stockinette at T8 and CT8 at T9). Got the quick swatch made with
little issue and got right into making the first sleeve. You’d think I was a
beginner! oh man! I laboured over that sleeve. Stitches were dropping, hanging
up, not knitting and the air was blue! Got it done in three hours. Should have
been maybe one hour with a coffee break in there! I didn’t know what was wrong.
I was ignoring that voice in my head that always says if you’re having trouble,
stop and figure out why…
Next
morning, I felt like a brand-new baby duckling, fresh into the world, no
knowledge or experience and repeated the same thing again! At the end of the
second sleeve, I was worn out and I thought that maybe Cotton Tale 8 was not
for lace. Suddenly it dawned on me – what would MAO tell someone else who
listed all those issues with lace – she would immediately say, ‘how’s your
sponge bar?’ OMFGG!
I made a
quick swatch of the lace at T7 with the lace carriage – just to be clear, this
yarn is so nice, I really do love it – it is about the same weight as Bonita (I
have used extensively with lace carriage!) which is a mercerised cotton but this
washes up very soft and seems a little thicker than Bonita, so in comparison, Bonita was at T6
with my Silver Reed lace carriage and I’ve decided to try T7 with Cottontale 8
(Bonita in stockinette at T8 and CT8 at T9). Got the quick swatch made with
little issue and got right into making the first sleeve. You’d think I was a
beginner! oh man! I laboured over that sleeve. Stitches were dropping, hanging
up, not knitting and the air was blue! Got it done in three hours. Should have
been maybe one hour with a coffee break in there! I didn’t know what was wrong.
I was ignoring that voice in my head that always says if you’re having trouble,
stop and figure out why…
Next
morning, I felt like a brand-new baby duckling, fresh into the world, no
knowledge or experience and repeated the same thing again! At the end of the
second sleeve, I was worn out and I thought that maybe Cotton Tale 8 was not
for lace. Suddenly it dawned on me – what would MAO tell someone else who
listed all those issues with lace – she would immediately say, ‘how’s your
sponge bar?’ OMFGG!

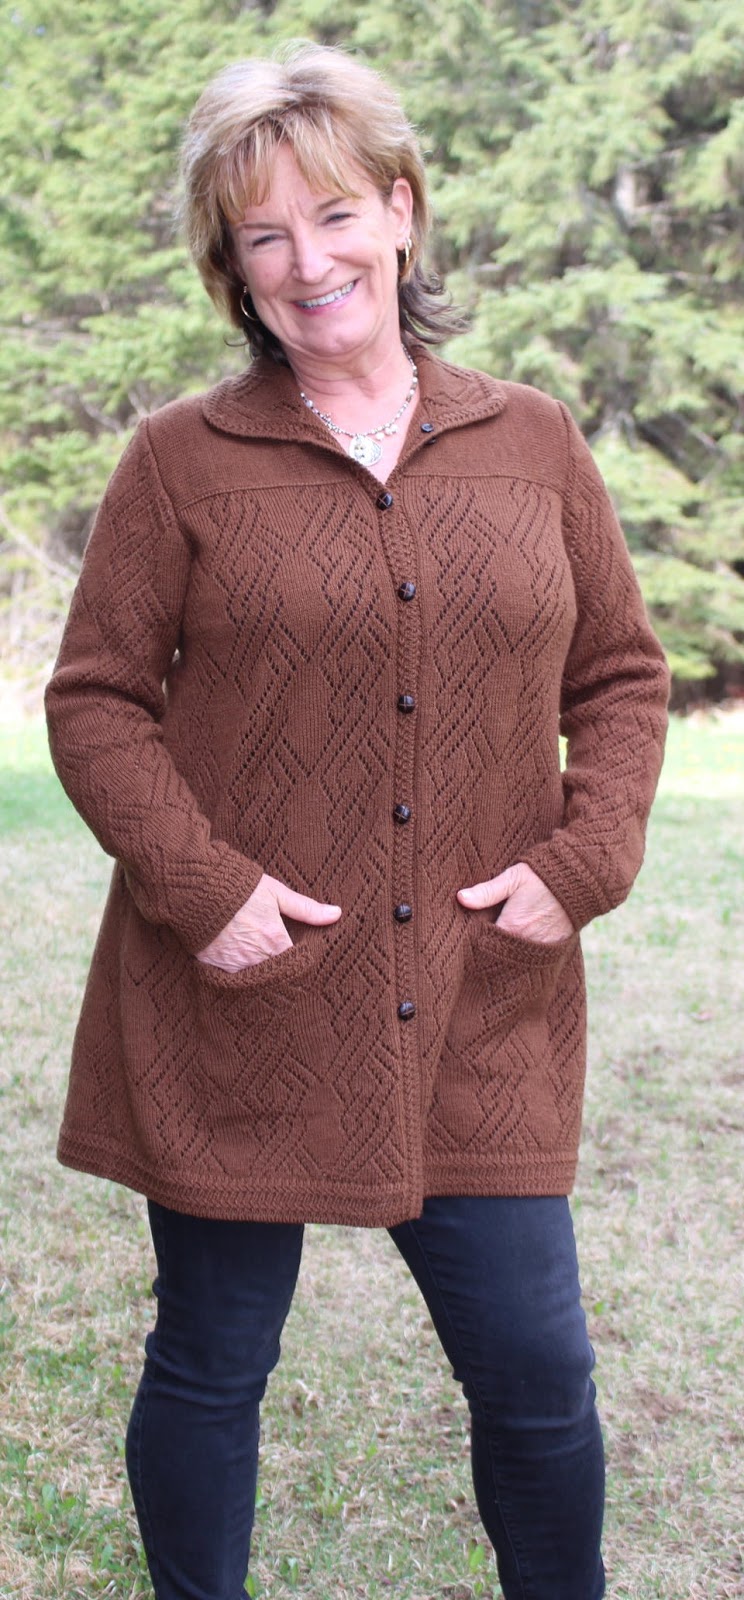
 Replaced
the sponge bar – it was pretty flat – oh and by the way, I always keep a
somewhat used sponge bar to put in for lace – if you put a brand new, super firm
one you’re just asking for more trouble – it will hold the needles too tight
and close and you’ll have almost the same experience as the well used, almost
flat sponge! Got the remaining pieces done in record time! Bonus, there is 90g
white yarn left – just enough for narrow 1X1 tuck hems (#32 Band Practise) and stockinette bands for
neck and fronts. Here’s me, super happy! I’ll be placing an order for more CT8
soon – Charlene sent me a printed shade card – thanks!
P.S. I’m
giving you a rest from my knitting for a while – I’m off to Ireland with sister
Janet for a hiking tour – back here on June 21!
Replaced
the sponge bar – it was pretty flat – oh and by the way, I always keep a
somewhat used sponge bar to put in for lace – if you put a brand new, super firm
one you’re just asking for more trouble – it will hold the needles too tight
and close and you’ll have almost the same experience as the well used, almost
flat sponge! Got the remaining pieces done in record time! Bonus, there is 90g
white yarn left – just enough for narrow 1X1 tuck hems (#32 Band Practise) and stockinette bands for
neck and fronts. Here’s me, super happy! I’ll be placing an order for more CT8
soon – Charlene sent me a printed shade card – thanks!
P.S. I’m
giving you a rest from my knitting for a while – I’m off to Ireland with sister
Janet for a hiking tour – back here on June 21!
 The
entire garment is done, buttons on and I’ve decided the sleeves are just too
long. I would rather they be too long than too short, but because of the bell
shape, nothing to hold it back, the bottom edge is skimming my middle knuckle
and it just looks way too long. Many times, I do make the sleeves longer than I
need because if I’m giving it away after wearing a few times, the sleeves need
to be longer for regular sized people, but I want to keep this.
The
entire garment is done, buttons on and I’ve decided the sleeves are just too
long. I would rather they be too long than too short, but because of the bell
shape, nothing to hold it back, the bottom edge is skimming my middle knuckle
and it just looks way too long. Many times, I do make the sleeves longer than I
need because if I’m giving it away after wearing a few times, the sleeves need
to be longer for regular sized people, but I want to keep this.
 When I
put a cardigan together, the sleeves are the last thing added and when I am
darning in ends, I always keep the tails separate so the sleeve can be easily
removed without too much trouble. It’s a chain stitch, so simple enough to
unpick the last loop and pull it off. Undo the underarm seam – only need to go about
halfway, so the sleeve will open out to rehang the same width of the needles as
stitches at the underarm point – again when I was seaming this, I plan so the
tail end is at the top of the underarm just for this event. Rip back the sleeve
cap to the underarm and I want to shorten it by 10 rows so rip back another 8
rows. Hang the 10th row and pull out the 9th row that was holding the stitches
and then rip out the tenth row so there are no split or partial stitches. Now,
because the whole garment was already washed, I can’t reuse that yarn to make
the sleeve cap again - the gauge won’t match but fortunately I have enough of
the charcoal, new and unused! From the notes I made on my schematic, I know
exactly what row I was on and how many stitches at the underarm point so this
isn’t guesswork and if there was one or two decreases in those last ten rows,
it’s not really going to effect the width of the sleeve enough to bother going
further down and trying to re-shape to exactly what was there originally – the sleeve
cap is the important part here and it worked fine so the new one will be the
same. I will wash and dry all parts again (in the photo you can see the line
where the new, unwashed yarn is but that will disappear with the next
laundering) before reattaching the sleeves – actually the front bands are still
unwashed at this point.
When I
put a cardigan together, the sleeves are the last thing added and when I am
darning in ends, I always keep the tails separate so the sleeve can be easily
removed without too much trouble. It’s a chain stitch, so simple enough to
unpick the last loop and pull it off. Undo the underarm seam – only need to go about
halfway, so the sleeve will open out to rehang the same width of the needles as
stitches at the underarm point – again when I was seaming this, I plan so the
tail end is at the top of the underarm just for this event. Rip back the sleeve
cap to the underarm and I want to shorten it by 10 rows so rip back another 8
rows. Hang the 10th row and pull out the 9th row that was holding the stitches
and then rip out the tenth row so there are no split or partial stitches. Now,
because the whole garment was already washed, I can’t reuse that yarn to make
the sleeve cap again - the gauge won’t match but fortunately I have enough of
the charcoal, new and unused! From the notes I made on my schematic, I know
exactly what row I was on and how many stitches at the underarm point so this
isn’t guesswork and if there was one or two decreases in those last ten rows,
it’s not really going to effect the width of the sleeve enough to bother going
further down and trying to re-shape to exactly what was there originally – the sleeve
cap is the important part here and it worked fine so the new one will be the
same. I will wash and dry all parts again (in the photo you can see the line
where the new, unwashed yarn is but that will disappear with the next
laundering) before reattaching the sleeves – actually the front bands are still
unwashed at this point.

 I don’t remember ever showing this little trick of mine
for finishing the ends of a stockinette band like the new front bands. I take a
long straight pin and thread it through the outside edge of the stitches, repeating with a second pin on the other side, to take the curl/roll out of the end. Then I steam this, so it lays relatively flat. With a tail of the yarn, beginning at the inside, stab stitch - don't whip stitch or back stitch - go in two stitches, through both layers, then go up and out the next two, staying in the centre of the outside row - neatly to sew up the end invisibly. Hope you can see this!
I don’t remember ever showing this little trick of mine
for finishing the ends of a stockinette band like the new front bands. I take a
long straight pin and thread it through the outside edge of the stitches, repeating with a second pin on the other side, to take the curl/roll out of the end. Then I steam this, so it lays relatively flat. With a tail of the yarn, beginning at the inside, stab stitch - don't whip stitch or back stitch - go in two stitches, through both layers, then go up and out the next two, staying in the centre of the outside row - neatly to sew up the end invisibly. Hope you can see this!
 That’s
bound to happen once in a while! Good thing I never wanted to become an
engineer – obviously my mind’s eye is rather shortsighted! Ha! that tubular
band that I so enjoyed knitting – 2 pieces of 1000 rows each – wasted! and
darny darn! those buttonholes were in exactly the right place! But at least my
collar works!
Next
idea – obviously a vertically knit band does not work here because I need to
encase the edge where the collar folds back, otherwise the seaming is ugly.
This means a horizontal band. To make it long/wide enough (100cm/39.5 in) it
either needs to be done in 2 pieces or do it in a full needle rib and attach it
by hand but that is still iffy, and I never do that. A stockinette band would
match the bottom hem – the width of the back hem is 65 cm, but the tubular knit
is very difficult to make a horizontal buttonhole in – I remember trying it on
the past and making myself a sticky note to remind myself this does not work –
I have a short memory for bad stuff, what can I say? I have a drawer of awful
hair products that I’ve tried, and they don’t work and if I just throw them
out, I’ll end up buying them again but at least if I keep them it reminds me
they didn’t work – we all have flaws – that’s how I deal with mine! ;-)
Back to
the band, the width of the bottom band tells me I can get a stockinette band
that is long enough to go from the hem to the neckline join and then another
shorter piece (30 cm) for the edge of the collar – this seems the best bet and
having the join in the band at the same place as the seam between the neckline and
the collar makes the most sense.
That’s
bound to happen once in a while! Good thing I never wanted to become an
engineer – obviously my mind’s eye is rather shortsighted! Ha! that tubular
band that I so enjoyed knitting – 2 pieces of 1000 rows each – wasted! and
darny darn! those buttonholes were in exactly the right place! But at least my
collar works!
Next
idea – obviously a vertically knit band does not work here because I need to
encase the edge where the collar folds back, otherwise the seaming is ugly.
This means a horizontal band. To make it long/wide enough (100cm/39.5 in) it
either needs to be done in 2 pieces or do it in a full needle rib and attach it
by hand but that is still iffy, and I never do that. A stockinette band would
match the bottom hem – the width of the back hem is 65 cm, but the tubular knit
is very difficult to make a horizontal buttonhole in – I remember trying it on
the past and making myself a sticky note to remind myself this does not work –
I have a short memory for bad stuff, what can I say? I have a drawer of awful
hair products that I’ve tried, and they don’t work and if I just throw them
out, I’ll end up buying them again but at least if I keep them it reminds me
they didn’t work – we all have flaws – that’s how I deal with mine! ;-)
Back to
the band, the width of the bottom band tells me I can get a stockinette band
that is long enough to go from the hem to the neckline join and then another
shorter piece (30 cm) for the edge of the collar – this seems the best bet and
having the join in the band at the same place as the seam between the neckline and
the collar makes the most sense.
 I looked
through the last few issues of KNITWORDS to see if I had used a band like what
I want here and yes! No 52, Purple Purls (it’s always so much nicer when
someone else has done all the work for you!) had a graded tension stockinette
band that encased the edge – I use stockinette bands many times but they are
mostly hemmed and attached to the front but I want the band to cover up the
edge stitch so there is no seam/chain line. My new band is made (10 rows,
beginning at T9 and grading one dot tighter per row to T6, a loose row of T10
for the fold, and then grade back up from T6 to T9 at RC021) and then an RTR
(remove, turn, rehang – which gives a nice, little detail in the finishing,
looks like a garter stitch ridge between the band and the garment selvedge) and
then removed on the garter bar. The selvedge edge of the front is hung (right
side facing here), the band is turned and rehung, pulling the open stitches of
the band through the garment edge. Now the hem is hung, and a loose row knit
manually to join and chain off. Looks fabulous from inside and out! OMG! Why
did I not do this in the first place?
I looked
through the last few issues of KNITWORDS to see if I had used a band like what
I want here and yes! No 52, Purple Purls (it’s always so much nicer when
someone else has done all the work for you!) had a graded tension stockinette
band that encased the edge – I use stockinette bands many times but they are
mostly hemmed and attached to the front but I want the band to cover up the
edge stitch so there is no seam/chain line. My new band is made (10 rows,
beginning at T9 and grading one dot tighter per row to T6, a loose row of T10
for the fold, and then grade back up from T6 to T9 at RC021) and then an RTR
(remove, turn, rehang – which gives a nice, little detail in the finishing,
looks like a garter stitch ridge between the band and the garment selvedge) and
then removed on the garter bar. The selvedge edge of the front is hung (right
side facing here), the band is turned and rehung, pulling the open stitches of
the band through the garment edge. Now the hem is hung, and a loose row knit
manually to join and chain off. Looks fabulous from inside and out! OMG! Why
did I not do this in the first place?
 If you
were at listening to me at a seminar, you may have heard me talking about
shortrowing at the hemline to add a curve to the bottom to compensate for the
Aline – basically A-line shaping means decreasing evenly spaced up the side
seam from the hem to the underarm, which creates an angle and makes a longer
line than what you will have at the centre front/back of the garment. To avoid
that pulled-up or shorter look, I usually add extra rows in the centre of the
Back and Fronts, depending on the overall length and width of the garment. On Pocket Change and Ozark, it was 8 rows beginning right after the first row of main
colour on the main bed, after the hem. Doing it on Ozark was the first time I did this on a striped garment. Only
after the cardigan was totally finished, I was wearing it and admiring myself
in my full-length mirror, did I realize that because of the stripes, this was
noticeable – to me anyway – not likely anyone else. To avoid that in this
striped version, I spread the shortrows out in several stripes. Instead of
making 8 shortrows one after another, I did 2 rows in the charcoal, holding 30
sts at centre, twice, then on the silver stripe, I held 40 sts twice, with 50
sts in the next large silver stripe and ending up with 60 sts in the red
stripe. Hope this makes sense!
Balancing
the colours – my plan was to have red all around the edges, with the bands. I
kept the hemline the same Back and Front and the top is all charcoal. I thought
this would keep it from looking too wild.
The
patch pocket – the one in Ozark works
well, no sagging or bagging - I made this one slightly larger and revised that
method from March 28. I realized I over-complicated things for the final
cast-off and the top of the pocket is finished with an easier, double stranded
loose row that is just chained off – I edited that post to reflect the change.
Had to re-engineer
the collar slightly and compensate for less width at the centre front – Ozark had an overlap and the longstitch
facings, so this collar is not as wide overall and the angle from the neck to
the shoulder had to be changed.
If you
were at listening to me at a seminar, you may have heard me talking about
shortrowing at the hemline to add a curve to the bottom to compensate for the
Aline – basically A-line shaping means decreasing evenly spaced up the side
seam from the hem to the underarm, which creates an angle and makes a longer
line than what you will have at the centre front/back of the garment. To avoid
that pulled-up or shorter look, I usually add extra rows in the centre of the
Back and Fronts, depending on the overall length and width of the garment. On Pocket Change and Ozark, it was 8 rows beginning right after the first row of main
colour on the main bed, after the hem. Doing it on Ozark was the first time I did this on a striped garment. Only
after the cardigan was totally finished, I was wearing it and admiring myself
in my full-length mirror, did I realize that because of the stripes, this was
noticeable – to me anyway – not likely anyone else. To avoid that in this
striped version, I spread the shortrows out in several stripes. Instead of
making 8 shortrows one after another, I did 2 rows in the charcoal, holding 30
sts at centre, twice, then on the silver stripe, I held 40 sts twice, with 50
sts in the next large silver stripe and ending up with 60 sts in the red
stripe. Hope this makes sense!
Balancing
the colours – my plan was to have red all around the edges, with the bands. I
kept the hemline the same Back and Front and the top is all charcoal. I thought
this would keep it from looking too wild.
The
patch pocket – the one in Ozark works
well, no sagging or bagging - I made this one slightly larger and revised that
method from March 28. I realized I over-complicated things for the final
cast-off and the top of the pocket is finished with an easier, double stranded
loose row that is just chained off – I edited that post to reflect the change.
Had to re-engineer
the collar slightly and compensate for less width at the centre front – Ozark had an overlap and the longstitch
facings, so this collar is not as wide overall and the angle from the neck to
the shoulder had to be changed.
 Using button/buttonhole
band from Geezer Chic, KW #50 – I
made a swatch of the tubular band, using 6-0-6 ns, a little narrower because of
the larger gauge with this yarn. I got a row gauge (after washing and drying!)
of 80 rows to 10 cm. How to figure out buttonhole placement? I was chuckling as
I did this – at the Spring Fling seminar some one brought up the question of
how many buttons should be on a garment and someone else said they had heard
that an uneven number was the ‘rule’. Well, I had never heard that, and it was
quite funny because as I put each garment on during my presentation, they could
see there is apparently no rhyme or rule to the MAO method of buttoning a
garment. My only rule is, because I have a large bust, the most important
button for me is at the bust point and I work from there. The bust point is
usually at the same spot as the beginning of the underarm shaping – convenient
but, I’m talking about my patterns, remember. I like my armholes high, whether
it has a sleeve or not. So especially for a vertically made band, this is easy
to figure – I look at my schematic and take the side seam measurement, add in
the hem (and any shortrows) and that is my starting position (58 cm). Then,
based on the width of the band and the size of the button (I will usually have
purchased buttons by now, taking my swatch to the store - the number of buttons
on a card and the price will play a part here) I can determine where the
buttonholes will start and finish. 4 in/10 cm between buttons is good for the
7/8 in/23 mm button I have chosen, so I add the size of the buttonhole to the 4
inches and round it to 5 inches between the start of each vertical buttonhole.
Based on my swatch, I can work back to having the first hole start at 20 cm
from the bottom of the hem, and 5 holes will do it, with the top one likely
never being buttoned and the 4th one exactly at my bust point/underarm.
Using button/buttonhole
band from Geezer Chic, KW #50 – I
made a swatch of the tubular band, using 6-0-6 ns, a little narrower because of
the larger gauge with this yarn. I got a row gauge (after washing and drying!)
of 80 rows to 10 cm. How to figure out buttonhole placement? I was chuckling as
I did this – at the Spring Fling seminar some one brought up the question of
how many buttons should be on a garment and someone else said they had heard
that an uneven number was the ‘rule’. Well, I had never heard that, and it was
quite funny because as I put each garment on during my presentation, they could
see there is apparently no rhyme or rule to the MAO method of buttoning a
garment. My only rule is, because I have a large bust, the most important
button for me is at the bust point and I work from there. The bust point is
usually at the same spot as the beginning of the underarm shaping – convenient
but, I’m talking about my patterns, remember. I like my armholes high, whether
it has a sleeve or not. So especially for a vertically made band, this is easy
to figure – I look at my schematic and take the side seam measurement, add in
the hem (and any shortrows) and that is my starting position (58 cm). Then,
based on the width of the band and the size of the button (I will usually have
purchased buttons by now, taking my swatch to the store - the number of buttons
on a card and the price will play a part here) I can determine where the
buttonholes will start and finish. 4 in/10 cm between buttons is good for the
7/8 in/23 mm button I have chosen, so I add the size of the buttonhole to the 4
inches and round it to 5 inches between the start of each vertical buttonhole.
Based on my swatch, I can work back to having the first hole start at 20 cm
from the bottom of the hem, and 5 holes will do it, with the top one likely
never being buttoned and the 4th one exactly at my bust point/underarm.
 OMG! I
just realized in that pattern, Geezer Chic,
I never told how to finish off the band – either no one ever made it, or they
figured it out for themselves! I’m going to go with the latter but here’s what
I do. Knit the number of rows for the band and at the end – don’t cast off.
Just close the end by switching to full needle rib/zigzag, tighten the tension
to about T4/4 and K3R. Cut the yarn and drop from the machine. Being cotton,
this needs to be laundered before attaching the band. I put it together, except
for attaching the sleeves and the bands (and the patch pockets). Darn in the
ends on the sleeves, side seams etc. but not the centre front edges – these
tails can be drawn into the tubular band after and save some time. After
laundering, pin band in place, try on and check that it looks good. The end can
be ripped back to the required length. Then, simply take the tail of yarn in a
darning needle and thread it through the loops, one from each side across the
row to the other side and secure it to the desired width. No point in trying to
cast off as it will just widen, stiffen and look bad. Do this after the band is attached - I just took this photo to show you how to do it.
I’m
calling this Lipstick and Smoke!
OMG! I
just realized in that pattern, Geezer Chic,
I never told how to finish off the band – either no one ever made it, or they
figured it out for themselves! I’m going to go with the latter but here’s what
I do. Knit the number of rows for the band and at the end – don’t cast off.
Just close the end by switching to full needle rib/zigzag, tighten the tension
to about T4/4 and K3R. Cut the yarn and drop from the machine. Being cotton,
this needs to be laundered before attaching the band. I put it together, except
for attaching the sleeves and the bands (and the patch pockets). Darn in the
ends on the sleeves, side seams etc. but not the centre front edges – these
tails can be drawn into the tubular band after and save some time. After
laundering, pin band in place, try on and check that it looks good. The end can
be ripped back to the required length. Then, simply take the tail of yarn in a
darning needle and thread it through the loops, one from each side across the
row to the other side and secure it to the desired width. No point in trying to
cast off as it will just widen, stiffen and look bad. Do this after the band is attached - I just took this photo to show you how to do it.
I’m
calling this Lipstick and Smoke!
 oh man!
how did this happen? I’ve been power knitting, I’ll admit – when I get excited
about a project, it’s hard to slow down - I can’t wait to see the final thing!
Two sleeves, one back and two fronts knit – did I forget to mention this was random,
nothing matching? Pinned them together, tried on and was happy with the result.
Took the
pins out and began the seaming. I always seam the bands/hems by hand and then
hang the long seams on the machine or the linker. Did that for the sleeves,
excellent result. Did the right front to the back. Good to go and then brought
the left front hem to the back, butting them together and OMG! The front hem is
slightly narrower than the back! I must have fudged the row counter – for this
double bed hem, after knitting the waste yarn and circular ravel cord, I place
the carriages at the left and knit the first row of main yarn, zigzag from left
to right. Then, set to circular, and turn the row counter to 000…whatever, the
front hem is only 18 rows as opposed to the other 20 rows! Arr-g-g-h! Two
options come to mind…re-knit the entire right front? Go for the save by
re-making the hem and grafting it onto the bottom first row of stockinette?
There is really no contest here, I have to go with the graft.
oh man!
how did this happen? I’ve been power knitting, I’ll admit – when I get excited
about a project, it’s hard to slow down - I can’t wait to see the final thing!
Two sleeves, one back and two fronts knit – did I forget to mention this was random,
nothing matching? Pinned them together, tried on and was happy with the result.
Took the
pins out and began the seaming. I always seam the bands/hems by hand and then
hang the long seams on the machine or the linker. Did that for the sleeves,
excellent result. Did the right front to the back. Good to go and then brought
the left front hem to the back, butting them together and OMG! The front hem is
slightly narrower than the back! I must have fudged the row counter – for this
double bed hem, after knitting the waste yarn and circular ravel cord, I place
the carriages at the left and knit the first row of main yarn, zigzag from left
to right. Then, set to circular, and turn the row counter to 000…whatever, the
front hem is only 18 rows as opposed to the other 20 rows! Arr-g-g-h! Two
options come to mind…re-knit the entire right front? Go for the save by
re-making the hem and grafting it onto the bottom first row of stockinette?
There is really no contest here, I have to go with the graft.
 The
first step is to remake the hem correctly and transfer it up to the main bed.
Knit one row in red to close the hem as usual and then remove it on waste yarn.
Next, get the hem off the front – I am going to pull the last red row thread
that joined the hem, leaving the loops of the first row of charcoal. Carefully
rehang those charcoal loops on the machine on the same number of needles as hem
was. Carefully unknit that row, from the side with the tail of yarn – it takes
a bit of picking and undoing but it can be done. The yarn of that row is what
I’m going to use to graft the two sets of stitches back together and the row of
grafting replaces or duplicates the first row so you won’t be able to tell
there ever was a problem. Knit this piece off on waste yarn, make sure you have
a good inch on each piece. Now, sit somewhere comfy with good light and from
the purl side, perform the graft.
BTW, so
totally impressed with this yarn – it knits beautifully with a minimum of
weights and no knots!!
The
first step is to remake the hem correctly and transfer it up to the main bed.
Knit one row in red to close the hem as usual and then remove it on waste yarn.
Next, get the hem off the front – I am going to pull the last red row thread
that joined the hem, leaving the loops of the first row of charcoal. Carefully
rehang those charcoal loops on the machine on the same number of needles as hem
was. Carefully unknit that row, from the side with the tail of yarn – it takes
a bit of picking and undoing but it can be done. The yarn of that row is what
I’m going to use to graft the two sets of stitches back together and the row of
grafting replaces or duplicates the first row so you won’t be able to tell
there ever was a problem. Knit this piece off on waste yarn, make sure you have
a good inch on each piece. Now, sit somewhere comfy with good light and from
the purl side, perform the graft.
BTW, so
totally impressed with this yarn – it knits beautifully with a minimum of
weights and no knots!!
Here
I am with five colours that need to be used together somehow…why did I choose
these? A couple of weeks ago, a girlfriend had on a hoodie – it was Tommy H – I
should have known! and it was a couple of grey colours with a red stripe and
some white or ivory I think and that’s been stuck in my brain and when I saw
two shades of grey, I went all in. I wanted five cones – I thought that would
give me a fair shot at determining the quality of this yarn, so I’ll admit, it
was an easy pick. It was hard to choose from the website as the colours don’t
always look like what you’ll get so adding in the black was last minute and I
figured it would go will all the shades no matter what – same reason I chose
white over ivory (although I’m totally excited they have ecru, vanilla, and pearl)
I may have to order one of every colour! I did find a page on their KKS Facebook
[https://www.facebook.com/pg/knitknackshop/photos/?tab=album&album_id=390848707620182]
that has all the cones together but no names on them – I guess you can’t have everything
but it’s easier to compare when they are all together.
I have
been wearing Ozark every time I go out of the house lately and I’m enjoying it
– it’s wool and one of these days, it’s bound to get warmer, so I thought I’d
do a cotton version. I’m still hooked on that ‘sailor’ collar – I’ve been
re-watching Downton Abbey and I never noticed it before, but those ladies did
rock the sailor collar over and over! Going to stick with the A-line shape for
the body instead of cutting it in to the waist as I did in O – going to try out
more random stripes and colour blocking – this may be a bit out of my comfort
zone, but, really five colours is, so why not? My basic plan is that it will be
outlined in red – I’m going to use the same circular hems but instead of the
longstitch facings, make tubular bands in red going up the centre fronts, added
later, and I’m thinking that way, I can use the knit side as the outside of the
collar – it works in my mind right now anyway! As usual, I start with the
sleeves…
 Don’t be
too shocked! BTW, if you are one of those multiple brand machine owners, the
Silver Reed/Studio is the best choice for a project like this – the jam release
gives a super-quick free pass for those odd number rows of stripes, or to move
to the opposite side for the next colour so you don’t have two ends to darn in
at the same place. Also, the fact there is no need to be closing/opening the gate each
time the yarn is changed makes for quick progress. If Silver Reed is your only brand,
bask in the glory!
Don’t be
too shocked! BTW, if you are one of those multiple brand machine owners, the
Silver Reed/Studio is the best choice for a project like this – the jam release
gives a super-quick free pass for those odd number rows of stripes, or to move
to the opposite side for the next colour so you don’t have two ends to darn in
at the same place. Also, the fact there is no need to be closing/opening the gate each
time the yarn is changed makes for quick progress. If Silver Reed is your only brand,
bask in the glory!
I told
you I was in Peru, Indiana a couple of weeks ago. Charlene Shafer and her family, the Knit Knack Shop, are the US distributors
for TAMM yarns and Cotton Tale 8. It’s
always so busy for me when at a show like that, I never get a chance to check
out what anyone else is doing or selling. I heard they had revamped Cotton Tale
8 – my only experience with CT8 was like 15 years ago from the old Bonnie
Triola Yarns days – never liked it, harsh feel, too many knots and lots of thick
and thin spots. When I got home I checked the KKS website – wow, nice colour
range and great price, $22 for a one pound cone. I also noted that it is close
to the same yardage as Bonita cotton which I have used extensively and is now
discontinued. I ordered white, black, red, silver and charcoal, thinking I
could make a striped manfriend hoodie (not) or new girlfriend hoodie ;-)!
Got my parcel on Saturday afternoon and whipped
off a couple of swatches before dinner. I made the striped one at T8 (unwashed
gauge, 30 sts and 38 rows to 10 cm/4 in – after machine wash and dry, 30 sts
and 46 rows) and stockinette charcoal at T9 (unwashed, 28 sts and 36 rows –
washed 29 sts and 43 rows). Anxious to give it a good trial, I put both
swatches in a sink of hot water and dish soap and swished them around – definitely
colour safe! Rinsed them and rolled in a towel. Tossed them in the dryer on cotton/hot
setting with a load of tea towels and tablecloths. WOW! I am so impressed. This
is soft, silky, smooth and lovely, no pilling! I may have found my new favourite
cotton! I can hardly wait for you to see what I’m making!
A noodie! LOL! not sure that will catch
on, but I’m loving mine! I wasn’t going to say anything because you already
know I can be a bit obsessive. I was just going to quietly knit this thing and
keep it to myself but I’m also somewhat of a show-off, I’ll admit it! With my Girlfriend Hoodie pattern in mind, I started
off making three pockets - oh, did I say three? Yeah, I was doing that decrease hack and loving it - it's so much faster than that old, outlined full-fashioned decrease and it truly looks nicer and lays flatter - but in my excitement, I must have been operating on auto-pilot and thinking of other things and on the second pocket, I ended at RC078 instead of the 82 rows of the first one - somewhere in there I didn't knit two rows between the battenburg transfers - easy to do when you are shortrowing at the same time and there is something happening on every row instead of just every second, and not concentrating! I made the third pocket (16g each, by the way), paying full attention and got it perfect.

 |
before washing
|
In my
haste for glory, I hadn’t weighed my cone at the beginning, just took the old
information from that old post and acted like I had the same size cone (1.2 lb/520g)
as the plumberry one. In my mind I was making a half-sleeved hoodie (do you
like that ‘half-sleeved’ term – I saw it for the first time on something the
other day and decided to use it a few times just to see if it catches on!),
knitting the half-sleeve in the battenburg lace, the body a little longer than
the original version, with narrower
bands to compensate (those deep stockinette bands do take more yarn so that was
a consideration) and of course a hood, because, after all, this is a hoodie,
right?
After both
sleeves were knit (I did weigh them, 46g each), I jumped right into making the
back, determined to get it made plain before I could reason my way into jazzing
it up unnecessarily. I kept saying to myself that people behind my back would
notice the beautiful half-sleeves without being distracted with random
patterning up the back and though I got it done quite quickly, was rather
dismayed to notice the diminished size of the cone! ouch! The back was 84g so
that meant that much again for the fronts and I still had bands to do – the hood
would take about half the weight/yardage of the Back and I began to readjust my vision. By the time I had the Fronts done I saw this garment as a zip-front, summer cardigan with picot hems and neckband with half sleeves in lace. Final tally, 42g left, good thing nothing was written in stone! Oh, and because of the shrinkage factor, when I first tried it on before laundering, it was like, yuck! this is way too big, but sure enough, the machine wash and dry sorted it out fine!

P.S. The hems were ‘Knitting on the EDGE’ #3 – I
used the neckline technique from Borderline, KW #25 and added 8 shortrows to centre
back and fronts (but not to pockets) to even out the A-line.
MSP here I come! I'm teaching at Founders Fest in Minneapolis, July 28, 29, 2018.
Google Midwest Machine Knitters Collaborative for more information and registration! Hope to see you there!
 After
the dust settled on Lipstick and Smoke,
the remaining yarn tally of my Cotton Tale 8 was charcoal, 194g; silver, 292g; black,
350g; white, 400g. The garment weight of L&S is 750g. As I was finishing
up, I was pondering my next project. White is the largest single amount and you
know I love lace. I still did not have a really perfect white summer cardi. I
want to take my raglan shape, add the extra wide full-fashioned decreases from Rich
Raglan (Serial Stuff 2), use the lace stitch pattern of Sampler Lace from KW#12 and the variable
here will be the bands. I am picturing a nice, half sleeve raglan cardi in a mixed-up
version of the lace sampler with white or possibly black or red bands all
round. My pattern for Rich Raglan is
based on the fact you may not have enough of the main colour for the bands so
they are all added after in case you need to switch colour.
After
the dust settled on Lipstick and Smoke,
the remaining yarn tally of my Cotton Tale 8 was charcoal, 194g; silver, 292g; black,
350g; white, 400g. The garment weight of L&S is 750g. As I was finishing
up, I was pondering my next project. White is the largest single amount and you
know I love lace. I still did not have a really perfect white summer cardi. I
want to take my raglan shape, add the extra wide full-fashioned decreases from Rich
Raglan (Serial Stuff 2), use the lace stitch pattern of Sampler Lace from KW#12 and the variable
here will be the bands. I am picturing a nice, half sleeve raglan cardi in a mixed-up
version of the lace sampler with white or possibly black or red bands all
round. My pattern for Rich Raglan is
based on the fact you may not have enough of the main colour for the bands so
they are all added after in case you need to switch colour. I made a
quick swatch of the lace at T7 with the lace carriage – just to be clear, this
yarn is so nice, I really do love it – it is about the same weight as Bonita (I
have used extensively with lace carriage!) which is a mercerised cotton but this
washes up very soft and seems a little thicker than Bonita, so in comparison, Bonita was at T6
with my Silver Reed lace carriage and I’ve decided to try T7 with Cottontale 8
(Bonita in stockinette at T8 and CT8 at T9). Got the quick swatch made with
little issue and got right into making the first sleeve. You’d think I was a
beginner! oh man! I laboured over that sleeve. Stitches were dropping, hanging
up, not knitting and the air was blue! Got it done in three hours. Should have
been maybe one hour with a coffee break in there! I didn’t know what was wrong.
I was ignoring that voice in my head that always says if you’re having trouble,
stop and figure out why…
I made a
quick swatch of the lace at T7 with the lace carriage – just to be clear, this
yarn is so nice, I really do love it – it is about the same weight as Bonita (I
have used extensively with lace carriage!) which is a mercerised cotton but this
washes up very soft and seems a little thicker than Bonita, so in comparison, Bonita was at T6
with my Silver Reed lace carriage and I’ve decided to try T7 with Cottontale 8
(Bonita in stockinette at T8 and CT8 at T9). Got the quick swatch made with
little issue and got right into making the first sleeve. You’d think I was a
beginner! oh man! I laboured over that sleeve. Stitches were dropping, hanging
up, not knitting and the air was blue! Got it done in three hours. Should have
been maybe one hour with a coffee break in there! I didn’t know what was wrong.
I was ignoring that voice in my head that always says if you’re having trouble,
stop and figure out why…
 Replaced
the sponge bar – it was pretty flat – oh and by the way, I always keep a
somewhat used sponge bar to put in for lace – if you put a brand new, super firm
one you’re just asking for more trouble – it will hold the needles too tight
and close and you’ll have almost the same experience as the well used, almost
flat sponge! Got the remaining pieces done in record time! Bonus, there is 90g
white yarn left – just enough for narrow 1X1 tuck hems (#32 Band Practise) and stockinette bands for
neck and fronts. Here’s me, super happy! I’ll be placing an order for more CT8
soon – Charlene sent me a printed shade card – thanks!
Replaced
the sponge bar – it was pretty flat – oh and by the way, I always keep a
somewhat used sponge bar to put in for lace – if you put a brand new, super firm
one you’re just asking for more trouble – it will hold the needles too tight
and close and you’ll have almost the same experience as the well used, almost
flat sponge! Got the remaining pieces done in record time! Bonus, there is 90g
white yarn left – just enough for narrow 1X1 tuck hems (#32 Band Practise) and stockinette bands for
neck and fronts. Here’s me, super happy! I’ll be placing an order for more CT8
soon – Charlene sent me a printed shade card – thanks!