Big thanks to the Tennessee Valley Machine Knitters! The venue was great; attendance was superb (they came from all over); lots of great questions and feed back! Becky, the AV lady was fabulous; shout out to Eloise, my timekeeper, and Sonia for taking care of my sales; to Margy and the rest of the TVMK organizers, thanks to all! The food and the weather, pretty awesome but it’s great to be home!
Sunday, March 31, 2019
mileage thoughts...
There
was a lot of driving/riding…It’s like 1500 miles, one way to Pigeon Forge and
although manfriend did the driving, I feel like I did but worse, if you know
what I mean. That’s a lot of thinking time! So many things and ideas, like why
didn’t I ever try putting a longstitch self-facing for the sloped edge of a pouch
pocket? Will the carriage from the SK840 work on the SK580 needle bed? I need pockets on that Uptown long duster. Will the patch
pocket technique work for lace? Will the dye-lot show? Oh wait, it was never
dye-lot-ed…will that make a difference? The age of the yarn, the number of times
the original had been laundered? Where it’s been pressed/ironed? Why do some drivers
think they own the left lane? Oh gosh, I never told them about angling the latch
tool to get a larger stitch for that chained edge…should I sew up the vent at
the bottom of the sleeves on the Juxtapose
Hoodie?
Big thanks to the Tennessee Valley Machine Knitters! The venue was great; attendance was superb (they came from all over); lots of great questions and feed back! Becky, the AV lady was fabulous; shout out to Eloise, my timekeeper, and Sonia for taking care of my sales; to Margy and the rest of the TVMK organizers, thanks to all! The food and the weather, pretty awesome but it’s great to be home!
Big thanks to the Tennessee Valley Machine Knitters! The venue was great; attendance was superb (they came from all over); lots of great questions and feed back! Becky, the AV lady was fabulous; shout out to Eloise, my timekeeper, and Sonia for taking care of my sales; to Margy and the rest of the TVMK organizers, thanks to all! The food and the weather, pretty awesome but it’s great to be home!
Sunday, March 17, 2019
couldn't help it...

 Wanted so badly to wear this!
 Not to worry, I made another so I could demo the zipper for the Tennessee Valley Machine Knitters!

How to choose what colours? By the proper zipper? I have quite a stockpile...Works for me!
My new strategy for yarn consumption for 2019 is one for me, one for another person. I can’t possibly make everything for me and I do have a raft of sisters, nieces and girlfriends! That way I can also use the colours I’m not really crazy about and give it away!
Road trip – talk to you in a couple of weeks!
Sunday, March 10, 2019
juxtapose hoodie...
 Just
finishing up the hood. I changed it up a little from the Manfriend Hoodie pattern. Because I decided the hood would be nicer
in the 4-row, narrow stripe sequence, I thought the front edge would look neat
with a narrow stockinette band around the face instead of the folded-inside hem
which forms the casing for the drawstring.
Just
finishing up the hood. I changed it up a little from the Manfriend Hoodie pattern. Because I decided the hood would be nicer
in the 4-row, narrow stripe sequence, I thought the front edge would look neat
with a narrow stockinette band around the face instead of the folded-inside hem
which forms the casing for the drawstring. The stockinette band would enclose the edge where the second colour is carried up the stripe and made a little smaller to naturally draw in the hood, so no drawstring is required, like Omega (from Serial Stuff #4) http://www.knitwords.com/bookstore.html
https://knitwords.blogspot.com/2017/01/multitasking.html
is done and like you’d do for a child since drawstrings around the neck are now frowned upon. Also grafted the shortrowed top of the hood and managed to get it looking just like the 4-row repeat!
Attached the hood according to my original instructions.
 |
| ready for the wash |
 |
| done except for sewing zipper with the sewing machine |
This is so cute! And I’m so proud of it! Wish you could see it! Oh, yeah, you could! Come to Pigeon Forge! I’ll have it there, showing you how to sew in the zipper!!
Friday, March 8, 2019
no yarn marks...
 |
| hang 2nd side, matching stripes |
You know I do everything I can on the machine – it makes a much better job than trying to mattress stitch seams by hand. Notice, the ends are mostly sewn before this. To do the underarm/side seam, it’s too long to hang the whole thing at one time. Hang the side from hem to underarm seam. Pick up the whole outside edge stitch, hanging evenly without stretching. Hang second side, matching stripes and filling in between.
 |
| close latches, knit tight row |
 |
| chain off loose row |
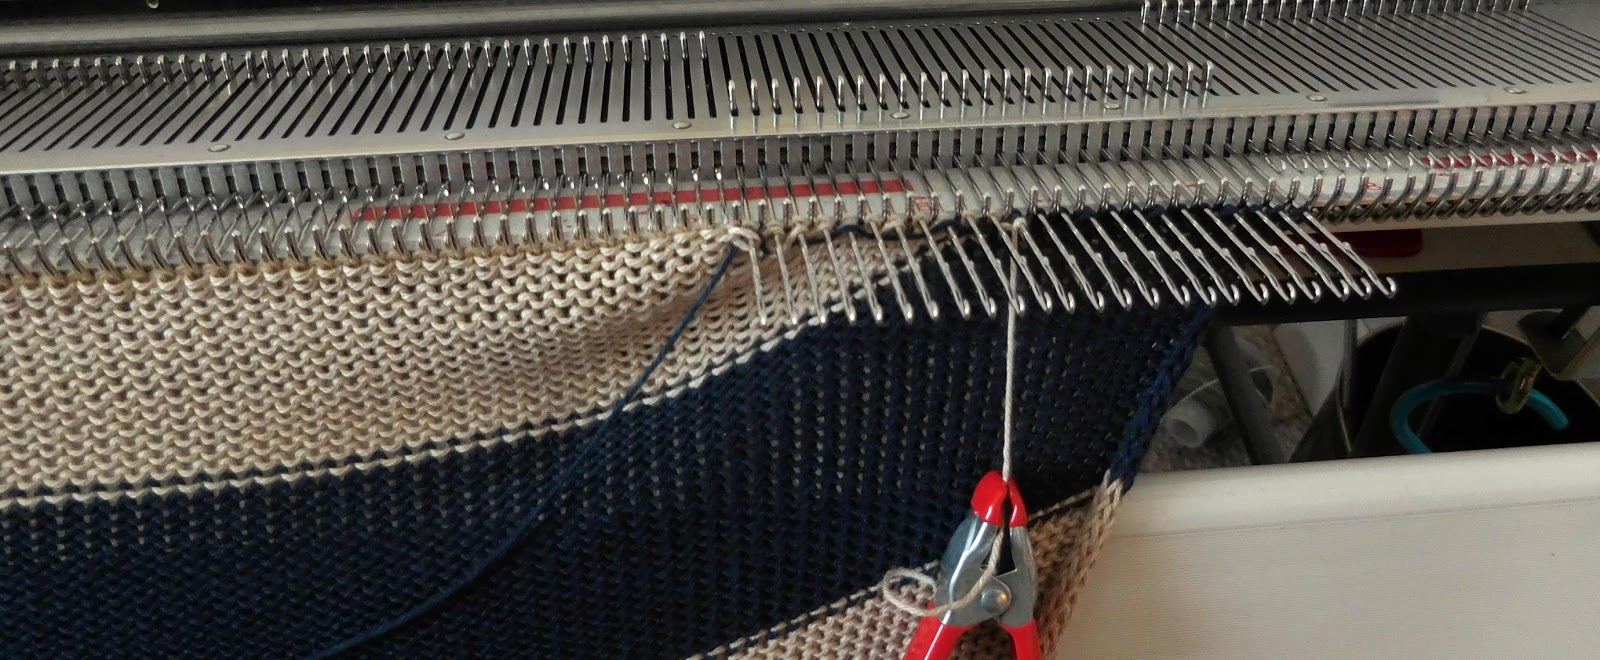
 |
| hang 2nd section without cutting yarn |
 Holding the last stitch on the latch tool, move it to the right
end of the needle bed, along with main yarn. Now hang the sleeve underarm seam
from right to left, matching stripes. Knit the tight row from right to left
with the tail you reserved at the beginning, remembering to close the latches.
Now, manually knit the loose row, again from right to left with the threaded-up
yarn. Chain off and look at that beautiful seam!
Holding the last stitch on the latch tool, move it to the right
end of the needle bed, along with main yarn. Now hang the sleeve underarm seam
from right to left, matching stripes. Knit the tight row from right to left
with the tail you reserved at the beginning, remembering to close the latches.
Now, manually knit the loose row, again from right to left with the threaded-up
yarn. Chain off and look at that beautiful seam!
Thursday, March 7, 2019
note to self...
 |
| armhole wrong side facing |
Left Front is done and with this outside seaming, you can just leave the shaped shoulder right there and take the corresponding back shoulder and, putting wrong sides together, hang on top, pull the Back stitches through, knit a semi-loose row and chain it off – don’t go real loose here because you want that row to stabilize the shoulder.
 |
| outside seam - uggghh! |
 |
| redone, much better! |
Good thing I know how to rehang open stitches!
Wednesday, March 6, 2019
slopes and hacks...
 Let’s
talk about the pockets. They are made first, and the top of the pocket is
attached to the Front as you’re knitting it, so this is a committed deal. You
can’t just take them off like a patch pocket and readjust. Made one, following the stripe
sequence for the Back, same as I’ll use on the Fronts, using the shortrowed
decrease hack https://knitwords.blogspot.com/2018/02/decreasing-hack.html
Let’s
talk about the pockets. They are made first, and the top of the pocket is
attached to the Front as you’re knitting it, so this is a committed deal. You
can’t just take them off like a patch pocket and readjust. Made one, following the stripe
sequence for the Back, same as I’ll use on the Fronts, using the shortrowed
decrease hack https://knitwords.blogspot.com/2018/02/decreasing-hack.html(which I LOVE!) for the slope of the pocket and did the cast-off in tan because it made the most sense – there was tan at the bottom and top of the slope, so I naturally had the tan in work at the point of the cast off. I wasn’t crazy about the tan going across the navy because I had in my mind that navy should be the main colour but then navy would be interrupting the tan…yada, yada, yada. It’s probably time to go back to the original 3-stitch outlined decrease.
Look at me, making all these swatches ;)!!
Tuesday, March 5, 2019
alternatives...
 |
| Girlfriend Hoodie |
https://knitwords.blogspot.com/2015/06/manfriend-hoodie-pattern.html
 |
| Tumbleweed |
Monday, March 4, 2019
23 and me...
 |
| shortrowing underarm |
 |
| manually knit loose row in current colour |
 |
| chained off loose row, nice curve! |
To keep on track for the 23 row stripes, I made a little cheat list of the row numbers to change colours. At the underarm, still wanted to use shortrowing for the decreases – it makes a much neater curve to seam to, so what I did was knit so far in the navy. (oh yeah, I didn’t carry the tan up and into the curve – too much trouble and what’s two more ends at that point?) Finished the navy stripe and carrying it up the edge, completed the underarm decreases, still shortrowing and then cast off the whole bunch of held stitches with tan and continued!

Subscribe to:
Posts (Atom)
