Friday, May 19, 2023

dribs and drabs...

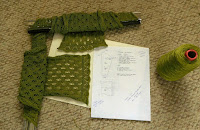
That’s what going on here lately! After finishing up the 1RT Pinkie I jumped right into using that marsh CannelĂ© that was gifted to me a while ago, still wanting that long, lace, button-front hoodie. https://knitwords.blogspot.com/2022/02/my-hole-theory.html  I had made several lace swatches in CannelĂ©, found some of them to be too stiff and was waffling, finally settling on this one – I  had used it way back in Knitwords #32, Black Cherry, in Wool Crepe Deluxe and, after swatching with the mercerised cotton and going with a larger stitch size, T7, resulted in a gauge of 27 sts and 40 rows, which gave lovely large holes. Previously, swatching at T6, like Borderline, from Knitwords #25 https://knitwords.blogspot.com/2014/04/kinky-knitting.html  with the gauge being 30 sts and 42 rows, it gave a crispness to the fabric that I didn’t really want this time.

Deciding upon the lace pattern was one thing but I also wanted to change up the hems a bit and, like I told you, I get hung up on something and have to re-work it over and over to get it out of my system, so went with that knitted-back wrap cast-on in another way. Paired it up with my #21 50 Ways re-do http://knitwords.blogspot.com/2020/06/better-late-than-never.html   and here’s what happened!

21b.  KNITTED-BACK WRAP Cast-ON, LACE EDGE, HAND TRANSFERRED. 8 stitch repeat, side away is right side.

1.     Add extra stitch at right edge. Cast-on waste yarn, ravel cord.  RC000. CAR. Measure out MC 6X width of ns in work. Double it over on itself to have 2 strands together.

2.     Using MC double strand, place loop on left end needle. take both strands under and to the left, then back up, over 2nd needle and back into hook of first needle. Push back on needle butt to knit both strands through, making about main tension-size stitch. Repeat across row.

3.     Single strand, MT-1, knit 2 rows.

4.     #1 right is the centre of the 8-st repeat. Beginning with #2 right, transfer this stitch to #1 right, repeat across row to have 2 sts on every other needle.  Leave empty ns in work. Knit 2 rows.  RC004

5.     Using 3-prong tool, transfer as in chart, starting with#1 right as the centre with 3 stitches together. Knit 2 rows.  RC006

6.     Transfer as in chart, using 2-prong tool.  Knit 2 rows.  RC008

7.     1-prong tool transfer as in chart. K2R. RC010                                                

8.     Make a tuck stitch border as follows: set to hold. Select #1 left and then bring EON to HP.

9.     Knit 2 rows.  RC012.

10.   Cancel hold. Carefully bring all ns out, making sure not to disturb the held sts. Knit 1 row. RC013. Set to MT. Continue in desired stitch. Remove WY and allow wrapped edge to curl forward on the knit side.

It looks like a chained cast-on!
Tuesday, May 9, 2023

egg on my face...

You know that One-Row-Tuck thing? I’m so sorry to say, I haven’t really seen a punchcard machine for some time – not that that makes any difference but sometimes I write something and with no one proof-reading me, I do make mistakes. It’s just whether you catch me or not! No more excuses, but to make a punchcard for a one-row-tuck pattern there needs to be a lot of holes! Because, with any tuck pattern, there’s already a lot of holes because the holes represent the knitted stitch and the blanks/unpunched spaces are the actual tucks.

How many punchcard machines are out there? That’s still no excuse, and again, I’m sorry! I have been giving out this same handout for years, at least since 2013 and nobody’s caught this error or at least brought it to my attention.

Here’s the new handout, with the correction in bold:

ONE ROW TUCK

To widen the fabric, add a subtle tuck with a row of plain knitting on every other row. On the knit side, it looks similar to a garter carriage texture and adds a masculine flavour. It can be used with the purl side as right side as they both look nice, but the purl side does have a slightly more lacy, girly look to it. The carriage setting is the same as all-over tuck, because the plain rows are programmed into the design. Use end needle selection to cancel tuck stitches on end needles. If doing this manually, it is only necessary to do it on the carriage side of the tuck row.

Tuck Stitch Pattern  Stitch design is 24 sts X 48 rows. Make punchcard as shown, repeating twice to make card long enough to rotate, making holes for white squares and leaving gray squares unpunched (which makes the tuck stitch) and add two rows of holes on top and bottom to join card.

Electronics, enter as shown, use reverse needle selection.

Silver with DAK, enter as Fairisle fabric, main colour on the tucked stitch. (Use that air knitting technique from the April 1, 2023 post to make sure you’ve got it right)

Silver electronics, move the point cams in one needle from end, to cancel end needles from tucking.

Brother, use end needle selection and enter opposite – i.e. holes for blanks-black for white.

Less weight will be required than a regular multi row tuck, but some is still necessary. Use claw weights on edges and move up every 50 rows or so.

For Brother machines , using the built-in patterns for regular tuck, choose one that has double rows of tucks and when setting for tuck, push in only one tuck button. Then every other row will knit as stockinette or plain and you can achieve the same effect with the built-in patterns.  EG - 930/940, #230, 233, 227, 232, 237. 238, 243...   970 - 221-225, 228, 231, 234, 240, 242, 243, 249, 250...

For more one row tuck patterns, see KNITWORDS No 41, Tiger in Training. No 42, Big Sister,  Body Basic. No 43, The Caped Wrapper. No 28, ABC Carcoat. No 26, Fade to Favourite; No 50, several.  Serial Stuff 1 – Sophisticate; Serial Stuff 4 - Rectangles.

Margie, I’m truly sorry – I do remember what it’s like to make a punchcard and it’s not so much fun when you have a mistake!


Monday, May 8, 2023

pinkie...

 Finished and mailed – she loves it!


As I was completing this pink thing, especially on the darning-in-ends part, it seemed to get pinker and pinker, in my mind! I sent Janet an ‘assembled’ photo and told her I could still over-dye it to tone down the colour, maybe give it a blue rinse to alter the shade, before I sewed on the buttons. She said she was fine with it, liked the idea of having another colour in her spring wardrobe. Okay, then I’m good with it too! Before sending it off, I weighed and compared it to the other lace hoodies of the same yarn – I had mentioned that regular tuck takes 30 to 40% more yarn than the same thing in stockinette or lace. This one weighed in at 520g. The yellow one, Holey Moley,  https://knitwords.blogspot.com/2021/05/smug.html  was 468g, the natural https://knitwords.blogspot.com/2021/09/sweater-weather.html was 486g and the clover https://knitwords.blogspot.com/2021/06/you-know-i-didnt.html was 488g, all basically the same size, so the 40g +/- more for this one-row-tuck project doesn’t seem that significant, less than 10 percent! Take note that this was knit quite loose, T9 as opposed to the T6 of lace.

What I did with the hems – you know how I get stuck on a technique (;0!) and have to use it again and again with maybe little changes here and there, back to that dishrag episode  https://knitwords.blogspot.com/2023/04/slippery-slope.html  and the knitted-back double ewrap…well, I put the cast-on and cast-off together and came up with a new trim, see below!

#154 Another Me-Cozy Variation  Double strand knitted-back double wrap and double knitted-back chain cast-offs create the look of a rolled garter stitch band added on – it is all manually knit on the machine. Start piece with waste yarn and ravel cord, knit two plain rows before going into whatever patterning is desired.

25-0-25 sts on WY.

Add to open stitches:

1. Reduce by 10% - 22-0-22 ns.  Rehang sts from WY, knit side facing you, gathering in evenly across row as required.

2. To add double-strand ewrap and knitted-back chain cast-offs, measure out 13X the width of needles. Using the fold end of the doubled yarn, from left, place loop on end needle, take doubled strand under and around next needle to right and back into hook of first needle. Pull back on needle butt to knit stitch through, approximating main tension stitch size. Take yarn under next two needles and then back into hook of second needle, knit back. Continue across in this manner. At right side, carefully bring all needles out. Yarn (still the doubled strand, at right, out of the feeder), take the yarn to the left, under the two next needles, and back into the hook of the first – knit that back for a large stitch, leave it in place. Take yarn to the left under next two needles, back to the right, drawing the first held stitch back, put yarn into the hook and knit it back for a large loose stitch. Continue across in this manner to left. Break yarn and then chain off all the loose stitches right to left.

The extra weight added by the double-stranding is just what is needed!