Thursday, February 28, 2019

moving on...

Forget patterning altogether! I’m going to knit plain! Haven’t made a hoodie for myself yet this year! My inspiration? My newest ‘vogs! I’ve noticed some striped garments lately that remind me of a twinset I did for Lindsay way back in Knitwords #41, called Juxta-pose! Always liked the mix of narrow stripes and then wider stripes. This is new Cotton Tale 8 I’m using – the navy is part of that 6 pack of blues I got (and didn’t like) and the tan is actually called ‘vanilla’ – what’s that all about? I have only one cone of the navy so it will be my predominant colour, I think and with two cones of the tan, hopefully I’ll have enough leftover for a whole garment of that. Notice, I did make a swatch!
The sleeves are going to be the narrow stripe, 4 rows of each colour so I’m using the single bed yarn changer for that. You know how I like to shortrow the sleeve cap so need to use the ravel cord method here because holding position doesn’t work with the yarn changer arm on.
end of shortrowed sleeve cap
At the top, I wanted to end with navy, so stopped at row 3, brought the left side back to work, knit the partial row, brought the right side back to work and knit it.
pull out ravel cord one side at a time
Then did an RTR (remove, turn, rehang) and knit a full row. This way I have a nice navy border across the sleeve cap as well as that garter stitch ridge which will look nice for the outside seam, same as on the Manfriend/Girlfriend Hoodie. The stripes for the back and fronts are going to be much wider so they won’t match anyway but I think the navy border between will look good.

Tested out my edging (#33, XOXO Trim from Band Practise) - thought I could just add it to the bottom and I could but don't like the way the tan colour peeps through when you pick up the stitches with the right side facing - that is rehung from the cast-on waste yarn and the edging is knit down and cast off. On the second sleeve, I rehung the bottom of the first navy stripe and then unravelled the tan - easy to do for 4 rows but not much more!
 

Friday, February 22, 2019

determination...

Got the back knit, row by row, watching carefully that I had a knit row and then a tuck row. It seemed to be dropping the signal more at the right side which was okay because it would knit the tuck row and then I just needed to manually advance the pattern row and it would knit plain to the left. It took some time, but I managed it, going on pure determination, still not too sure what was going wrong. The only thing that saved me here was the fact the stitch pattern was a 20-row repeat and I could use that multiple of ten to match the garment row counter easily. Had to do the same on the front. Sometimes I’d get lucky and it would knit 15 to 20 rows without losing the pattern, but I persevered and got it done over the weekend. The patterning is quite subtle anyway, especially in this darker colour.
The hemline looks great. I stuck with the 5 sts of longstitch just for the extra weight, to ensure the hem wouldn’t roll up. The neckline looks really good too - I am so impressed! I changed it to only 3 stitches on the rib bed, with the end needle on the ribber, because it doesn’t need the extra weight as it fits around the neck, just needs to lay flat and I wanted it to be narrow. It did the job and looks fabulous! It’s kind of what I’d call a bateau/boat neckline – there is very little shaping – the back neck is 3 cm deep and the front, 6 cm, with the width at 24 cm across. It is not stretchy but just fits over my head with a wee bit to spare, looks neat and so easy, with no extra finishing!
Time for the sleeves. I could knit them plain and no one would think anything of it, but I have this thing about giving up – can’t do it, and I go for the tuck patterning. Don’t need the ribber here because there is no longstitch. Hang the open stitches, purl side facing, because the knit side is the right/outside. Set up the patterning and, taking a deep breath, begin. It’s patterning flawlessly! I can’t believe it! I begin knitting quickly, thinking the stars are aligned and I’d better get this done while things are good. Get the whole sleeve done, not one single error or dropped signal. Then it dawns on me! The mis-patterning was only when I had the ribber linked up for the longstitch! Could it be that was just pulling the carriage slightly forward, causing the patterning faults? Maybe all I needed to do was adjust the ribber? Right now, I don’t care, just super ecstatic to get this finished up! Thanks for the inspiration, Eileen Fisher! Happy Birthday, Janet!

Wednesday, February 20, 2019

peanut butter...

Did I upset the machine knitting gods? Is there a black hole in my knitting room? Was it because I flaunted the no-swatching bit? Why, why, why? Don’t mean to sound so disjointed, here’s the back story!
Got back to my E Fisher project, made the dart and, happily, blissfully, completed the back, feeling like I was setting the mk-ing world on fire. Sadly, when I took the piece off, it was riddled with mis-patterning and random, plain rows. What the hay? Trying to convince myself that it was maybe a static issue, I tried everything. Switched out the N1 and point cams, the curl cord, cleaned and oiled, even put in a new sponge bar. Turned everything off, left it to cool for a hour or so, came back, tried it all again. Ripped out row 13 so many times, sure I’d worn out the yarn! Nothing worked. Went and pouted for a bit, came back and tried it all again. Started over at least 4 times and I’d get maybe 50 rows done fine and then it would start dropping the signal and I would get a plain row instead of the tuck. Rip it out, re-program and same thing over and over, like a Groundhog Day nightmare! Got tired of ripping out the row so took it all off on the garter bar. Concluded that my electronics were compromised but wasn’t sure if it was the carriage or the machine bed/panel.
I had a brainwave and got out my lace carriage to see if it would work and yes, it did! switched over to the knit carriage and the tuck pattern and everything worked fine. I even did a sample dart and it knit perfectly. Holding onto the thought that it was just mk-gremlins at work, I took the evening to think good thoughts, planning to get a new start in the morning.
Did a bit of air knitting (take the arm off so you can see the needles coming out and in) and things were looking good, the pattern was advancing properly, so I rehung the piece and started on the dart. Rats! same thing, no patterning!
Things went from bad to worse. I couldn’t get it to even knit one row correctly. Thought if I could hook up DesignaKnit and get it to work that would sort out which was the problem, the carriage or the knitting bed. You might remember last July, [https://knitwords.blogspot.com/2018/07/drama-queen.html] my DAK laptop quit and I was left with a long cord that would reach my old desktop, which doesn’t have a USB port – too old, like everything else in this room! I had a little adaptor thingy plugged into a port in the back that added 4 USB ports. I made the mistake of unplugging this thing just to look and now it does not work.
I remembered another old laptop, dug it out and thought I could use it with DAK7. Got it all hooked up, downloaded my stitch pattern, knit  two rows and the blessed computer blue-screened on me and started this awful clanking noise. Unplugged and closed up, it was still annoyingly boinking away. The noise continued – I couldn’t shut it off. To save my sanity, stuffed it back in the bag and took it down two flights to the basement and left it chattering away.
I tried installing DAK7 on the Windows 7 laptop and it’s not compatible – I’m sure I did this before, but I have a short memory for bad things. Tried DAK8 with the cable and it wouldn’t find the SL4. I even sent an email to Ms. Help at Knitcraft, explaining the situation and what could be done? The answer, 8 hours later was, ‘likely bad cable’. Yeah, heard that before!
Seeking solace, I went for a spoonful of peanut butter (Jif extra crunchy – it’s a little early for wine!). I keep it in the basement pantry for a couple of reasons. I hope the inaccessibility will prevent me from consuming the whole jar. I have a rule that I can only take a teaspoonful and must go back up to eat it. I hope that, as sometimes happens, by the time I get downstairs, I will have forgotten why I went there and, if that doesn’t work, at least I feel justified in that I had a couple of up and downs to counter-balance the calories. Anyway, that freakin’ computer was still faintly rattling away!
To be continued…

Tuesday, February 19, 2019

tempting fate...

Am going to try the shortrowed dart, in pattern, down the middle of the front of this sweater – I can hear you, ‘are you crazy, MAO?’  Well, my theory is, the stitch pattern is 20 rows so if I make the gore over 20 rows, I should be back at the same row of the pattern when I get everything back to work and those every-other-stockinette rows between will help hide the change. I’m going to work it to begin at the under bust area, down to the hem, which will hopefully diminish the impact…the original instructions from Side Steps are as follows:
Shortrowed dart: Carriage at hem side. Turn off row counter. Bring all ns to hold. Set to hold. At carriage side, return 15 ns to UWP, KWK, 4X. Carriage again at hem side. At side opposite, hold 15 ns, KWK, 3X. When carriage is back at hemline, cancel hold, turn on row counter or reset to what it was and continue. This is adding 14 rows for each dart at hip. When carriage is back at hemline, cancel hold, reset row counter and continue.
My change is:
Carriage at hem side.  RC060. Turn off KR11/shaping device. Set to hold. Bring all ns except 15 at carriage side to hold. KWK.  At carriage side, return 15 ns to UWP (fork them back to B so pattern will be read if necessary – I don’t have to because this is the plain row, so it doesn’t matter), KWK, 4X (that’s 5X in all). RC070. Carriage again at hem side. At side opposite, hold 12 ns, KWK, 4X. When carriage is back at hemline, cancel hold, turn on KR11 (cancel hold) and fork all sts back to B position. K1R. RC079. Reset RC060 and continue. This is adding 20 rows for each dart at hip. When carriage is back at hemline, cancel hold, reset row counter and continue.
Make sure when you’re shortrowing with tuck patterning that you don’t have a tuck on the last held needle (the one you will wrap). Knit it through manually before holding the needle or it could cause an extra bump that may show up. Also make sure the first needle after the wrap knits off too!
Feeling so self-righteous!

Friday, February 15, 2019

geek alert...

technical ingredients follow, this is not just reading entertainment!
Having printed out a page of the Side Steps pattern – I thought it might be prudent to note any changes I made because you never know – I could forget what I did by the time I may get around to trying again? Who knows? But did I read it? no! of course not! I always think I know what I’m doing! The machine was set up for double bed work and as I put my hand on the carriage, I felt so good because it dawned on me, I was actually going to be knitting single bed, except for the 5 stitches at the hem side that would be the longstitch facing there. Those could be added next, but I wanted a plain row of stockinette for the initial row. Almost as though you were watching, I quickly changed to the knit arm as if I intended to do that all along and cast-on – I need two sections here, one for the sleeve stitches and the rest for the side seam. Duh! how about some weight, particularly as I would be using the double bed. I quit and wrote yesterday’s story – see what I mean? any excuse!
Fresh this morning, here I am at the machine even before my workout (I can do that anytime). Just to refresh your memory (and mine but I can use you as the excuse!) the one-row-tuck is set up so every other row is plain and that’s when we want the longstitch to do the work on the rib bed so there are clean stitches opposite, no tucks on the main bed, that would interfere with making neat stitches on every other row on the rib bed, right? Right!
Cast on each section separately, using the single bed ribber comb method, https://knitwords.blogspot.com/2008/11/i-just-have-to-tell-you-i-finally.html
here’s how I did it: Bring out the needles you want, every other needle only. If using the knit carriage, obviously you don’t have the ribber up. If the ribber arm is on, you need to have the ribber engaged. With waste yarn, T10 (as loose as you can get), knit one row. Move the carriage out of the way (drop the rib bed to make it easier), take the ribber comb, with the wire out and insert it from below, same way as always, poking the fingers between the sinker loops. When it is successfully in there, with the sinker loops on your side of the prongs, tip the bottom of the comb back so the prongs come forward, allowing you to insert the wire, without catching the needles or sinker posts. Drop the comb. It falls below everything. Bring all needles to work, set stitch size to main tension, and knit 10-12 rows.
 
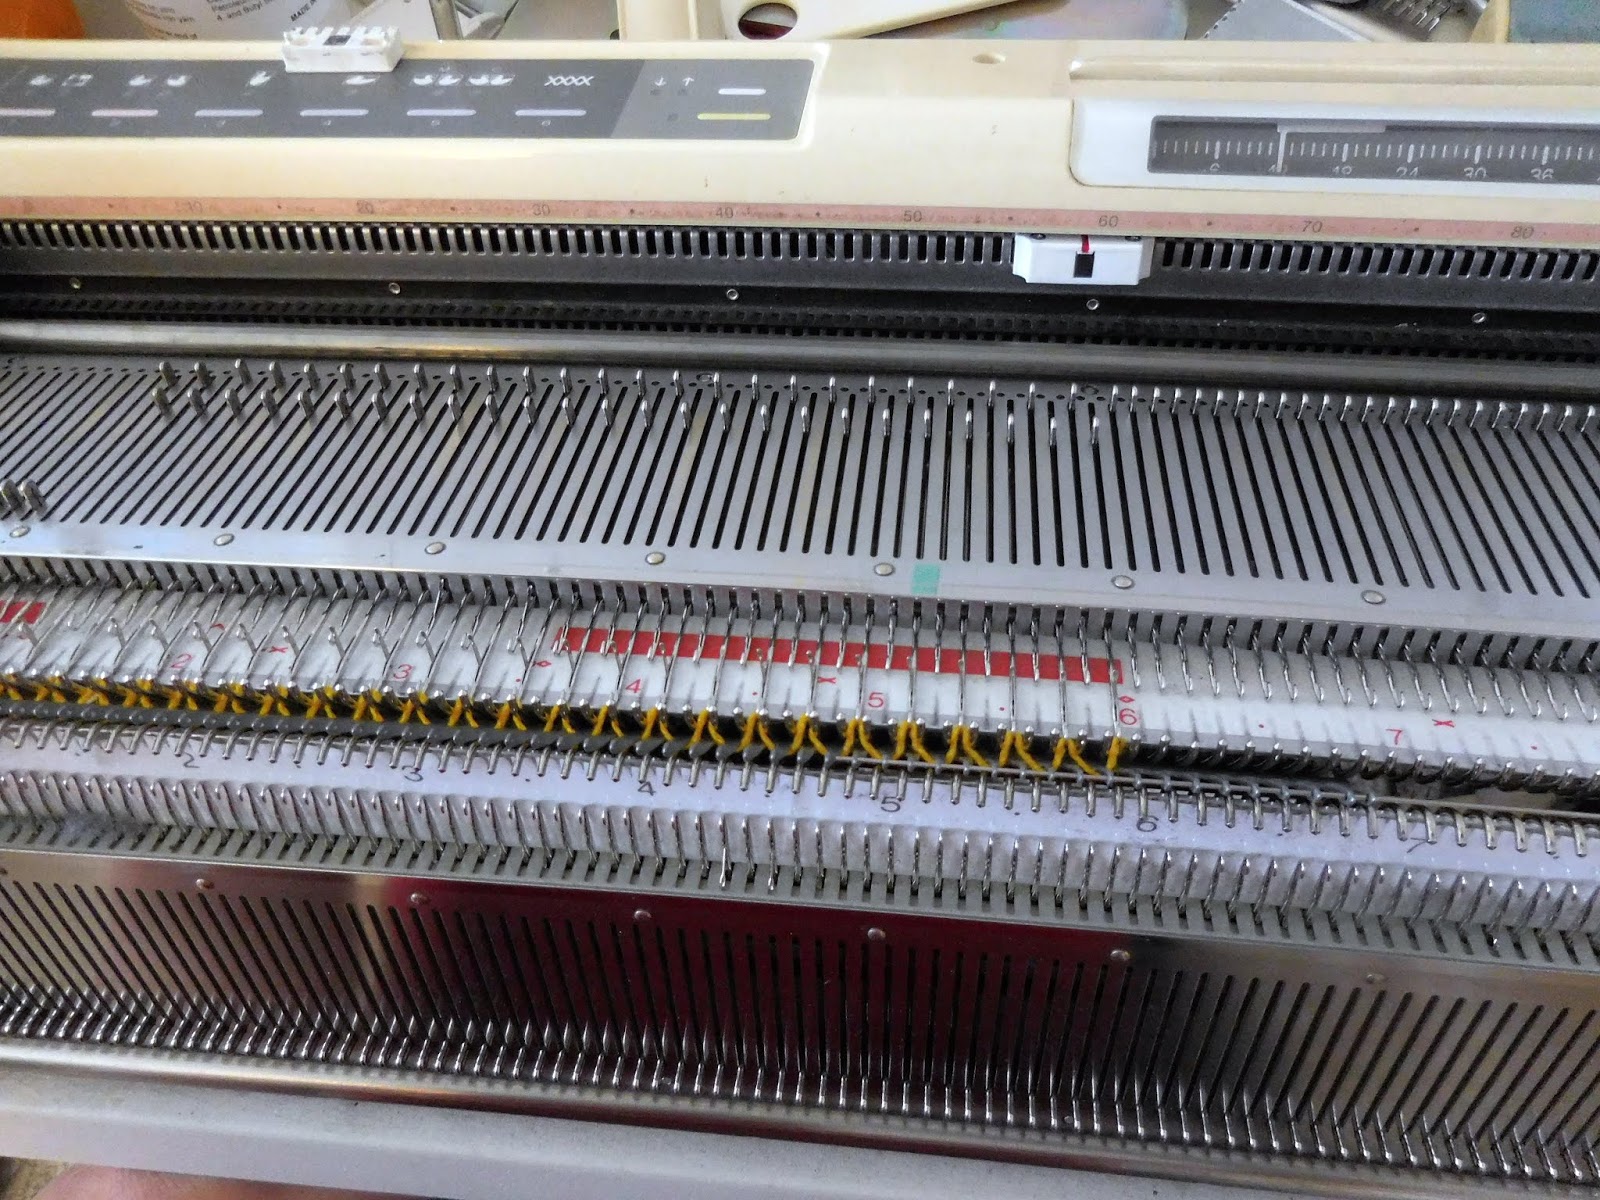
What I did this time: using the half width comb for the side seam portion (#75-0-10 ns) first, and then the small comb for the sleeve section (#11-60 ns) but leave everything between/behind the beds (add a row of ravel cord on each section to make it easier when rehanging later). With the carriage at the left, T8, stockinette, knit 1 row. Change to rib arm (read/program your row here) and add 5 sts at left on ribber for the facing, end needle on ribber (less than my usual seven because that’s what E Fisher did). Fingers crossed – that’s what swatches are for! Set to tuck (you added weights, didn’t you?) and knit row. The rib needles have a loop on them, which is enough to cast them on - don't worry, no one is going to see them anyway and we don't want a difficult, complicated join between the Back and Front! This row was the tuck row. Back at the right side, now, set the ribber to knit those facing stitches only on every other row which in this case is 0-1, same as in Rectangles.
Everything is knitting beautifully, shaping/increasing at right edge for the shoulder slope and life is good! UH-oh, the shortrowed dart/gore is coming up – probably a good time to take a break and get that workout in! ;)

Tuesday, February 12, 2019

cross knitting...

the action or practise of mixing elements of two separate patterns to create a new design.
I’ve thought about this and thought about it some more and to be honest with you, I’ve let any excuse get in my way of jumping in.
Side Steps

I’m merging two of my previous designs. Side Steps, a sideways- knit cardigan with shortrowed gores that add an A-line shape to the body - the Back and Fronts are knit, shoulders joined and then the sleeve is picked up from open stitches and knit down to the cuff. Why? Because it already has the basic shape I want for that Eileen Fisher knockoff. Easy to turn it into a pullover – just keep knitting across the front instead of leaving an opening that would make it a cardigan.
Then the other pattern is Rectangles from Serial Stuff 4. Why? It’s done with Wool Crepe Deluxe which is the yarn I’m going to use here and it had automatic longstitch facings (that I want to use for the new neckline and hemline) and, bonus, a one-row-tuck stitch pattern that will combat the possible biasing of the loose-tension sideways knit (I have 500g of this Norwegian Slate WCD that am certain with the loose tension will be enough to get this knit without too much running-out-of-yarn stress).
Rectangles
So, you probably figured me out already – I’m going to attempt this without reswatching! Just use the same tensions and numbers as Rectangles and put them into the same basic shape as Side Steps. It’s all there, just getting to it seems the issue. I did Rectangles with DAK for the tuck patterning source but if you recall my DAK laptop computer bit the dust a while back and even though I have a very long cable that will reach across the room to my old desktop, which also has DAK7 on it – that machine has been making weird noises and I think it’s on it last legs. Today, I bit the bullet and just drew the 12X20 stitch pattern onto a mylar – took me at least 10 minutes from printing out the template from my DAK8 laptop (which I’ve never been able to get to work with my SL4 thingy that went from DAK7 to the knitting machine). My other option would be to install DAK7 on the current working laptop, but I’d need a life – another excuse!
This may not work but I’ll have had the joy of sharing it with you! More diversion! :)

Monday, February 4, 2019

nail polish hack...

I’ve been meaning to share this with you for some time – my eyesight is getting poor, I know, but there are things that just shouldn’t be.  You know how they put raised emblem symbols on those electronic cables, but they are the background colour so if the light is poor or you don’t have your special reading glasses on you can’t see it? Well, I really noticed it on my printer USB cable and on my digital camera. The camera especially – it’s black and the little end that goes into the camera is very difficult to see which side is up. It finally dawned on me, instead of struggling and possible damaging the end, to mark the top side with something so it would be readily distinguishable, even without glasses. I put a swipe of nail polish on the top side, matching with the way it’s supposed to be inserted and my life is so much easier! I did it to all things that plug in!