Friday, April 30, 2021

the power of suggestion...

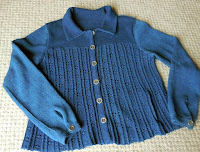
 I got an email from someone asking if I’d ever used Yeoman Yarns Brittany? Does the Pope have a nose? Have you used it for plain stockinette? Heck, yeah! Does it bias? Never happened to me! But guess who has 2 cones of Brittany in ‘pale primula’, well-aged (as is virtually everything on my shelves!) – it’s not quite the Pantone colour of the year but I have a couple of rayon print fabrics, recently purchased, slated for spring dresses and I think this goes perfect!

My inspiration, that last lacy cardigan, Smokin’ – love it! And in this cotton, oh my, so excited!

So, what’s the big mystery about cotton? And how do you know what to do? You’ve probably heard the horror stories: it grows during wearing and ends up stretching out; it makes a really heavy, draggy garment, hard to work with because you need to pre-shrink before putting together, the garment biases and twists – NOT to all that!  My guess is these stories are based on hand knitting or people using industrial cotton, not meant for our knitting machines, something that should only be used for knitting dishcloths (and WHY do they make dishcloths??? – sorry, Bonnie from WI – she did give me 3 back in 2018, I think, at the Founders Fest and honestly, I used them and came to love them – sadly, the last one developed holes and I think it’s time to put it to rest).

unwashed swatch
Anyway, I’m talking about a very good quality cotton, meant specifically for machine knitting.

My method of using cotton – allow for the shrinkage when making your swatch. This yarn, (Yeoman Yarns Brittany) is what I call a soft cotton – not mercerised and has a matte finish. Sample out or test knit for the gauge. You want it to look a little loose because laundering will shrink it and cause the knit stitches to become smaller and tighten up. I do use the dryer but don’t over-dry – that will cause the cotton to become stiff and hard – if this happens, no worries, just add water and try again! My theory from here is that when you launder the garment, regardless of the stitch, whether it is stockinette, lace, tuck or whatever, it is all going to shrink at the same rate so there is no need to pre-wash the pieces before assembly. I make the entire garment, put it all together (yes, it will be too big, at least, too long) and then launder it and presto, you have a lovely finished garment that fits and was easy to assemble!

Friday, April 23, 2021

the truth...

Sometimes I don’t tell you everything. Yeah, I admit it, not wanting to say, after all that work, that thing sucks. I don’t like it. It doesn’t fit right. It didn’t come out like I planned.  http://knitwords.blogspot.com/2021/02/all-aran-ed-out.html

But, what to do about it?


Usually after finishing something, I put it on and am so happy, I wear it for like three days straight! That red tunic, I didn’t even give it a name! When I put it on, I just thought, oh dear, yikes! I blamed it on my hair-do – or lack thereof! It was one of those days! Anyway, I did try the tunic on a couple more times, when my hair and make-up wouldn’t be the reason and yeah, I just didn’t like it.

I finally figured that I messed up on the sleeve – I had altered the original shape, narrowing the neck width, changing it into a closer-fitting round neckline, which brought the shoulder in. The top of the sleeve would sit at the top of my shoulder like a set-in sleeve, but I made the sleeve same as the original design, but, by mistake, the next size up! and although it all went together fine, there was just too much sleeve! The garment was bunching and thick at the underarms. It was tempting to just leave it, but I knew I would never wear it and I couldn’t give it away like that.

Before I could talk myself out of it, I took apart the side seams and ripped off the sleeves. It’s been kicking around the room since and I finally promised myself to fix it before I could move on to anything else.

Unravelled the sleeve down to row 60 – easy to figure where I was because of my notes and I still had the markings on the number strip to match up with the centre cable. Reknit the sleeve using the shape of the last one I made (charcoal lace – Smokin’ – ‘cuz that’s how I feel when wearing it!), so it’s much narrower at the underarm and then the curved cap.


Put it all back together, washed it to get the kinks out and yeah, it’s all good! I’ll be wearing it (Poppy Perfect) for the next three days! ;)

Tuesday, April 13, 2021

déjà vu…

This is not exactly a spring colour but, I love my lace carriage, and I had two full cones of this ‘charcoal’ Forsell pure new wool 4 ply and thought, I gotta do this! That Driftwood hoodie https://knitwords.blogspot.com/2020/11/under-wear.html  has been one of my favourite stay-at-home-all-day wardrobe staples – I love the shape of it, the feel of it (it’s a thickness thing!), the button front (instead of zippered) and it just makes me feel good. https://knitwords.blogspot.com/2020/11/hind-sight.html


You’d think I already have enough hoodies but in assessing things, I don’t have an all-over lace hoodie with pockets, so that’s my goal. Choosing a lace pattern was the next step and this one’s Me-Cozy from Knitwords #48. I have used it quite a few times over the years and as I wanted lots of holes, somewhat geometric, and no multiple passes, this fit the bill. I searched my books for an appropriate hem/band/trim but rather than another ribbed band, I hoped to keep it simple. Looking at my original design, I saw the edging was totally easy, just a rehang, ewrap, knit a row and then the cast-off, all ending up looking like a garter-stitch little hem. I tried it out on my swatch, and I had the feeling I did this before! https://knitwords.blogspot.com/2009/01/in-betweenssometime-last-week.html  I’ll go with that again!

Just for something a little different and to avoid the issue of having to hang the bottom of that original pocket, incorporating it into the hem, I went with a patch pocket that would be sewn on afterward. https://knitwords.blogspot.com/2018/02/decreasing-hack.html

When it came to doing the front bands, I figured the patch pockets would look much nicer if that centre side edge was incorporated into the front band, a little risky but what the hay? The devil may care!


Pleased to report my new Franky seaming technique of putting wrong sides together works very nicely on this one too! http://knitwords.blogspot.com/2021/03/she-likes-it.html

Oh, I just love this thing! I see another one in the near future! Who cares about spring colours? I’d be very happy for anyone to see me wearing this! ;)

Friday, April 9, 2021

denim done...

I got the set-in sleeve seaming sorted. Seamed the underarm using that ‘franky’ seaming technique - I can see that becoming my go-to method! That turned the sleeve cap into a ‘circle’, so, to join it to the body, in sections, starting at one end of the machine, hanging as far as it could stretch, casting off that part and then hanging the next. Worked fine.

I had already decided the front bands would be stockinette with the chain-stitch in the fold line (Side Steps https://knitwords.blogspot.com/2013/05/snow-days.html  and I thought the collar would look great with that too. Took me two trys to get it right, with the chain inserted between the angled ends, but looks good. I did a riff on that chain stitch added to the pocket edge https://knitwords.blogspot.com/2011/03/fourth-times-charm.html 

I was putting off dealing with the pockets to be honest. Almost resorted to my back-up plan of closing up the pocket opening by grafting over the ravel cord opening - no one would notice, up then I wouldn't have pockets! I had been so pleased with myself, thinking this was going to be easy. Putting the opening (green line of ravel cord to hold the stitches) as I was constructing the body, thinking I'd just knit an inside patch for the actual pocket. Realized that wouldn't work for various reasons and then it finally dawned on me to just sew a bag pocket that I could hand sew the opening to the pocket opening and stitch the fold along the inside of the front band so it would be held in place and not sag below the bottom edge and still be totally useable, not showing on the outside in any way. It works! So happy!